Preface
Ridgeback User Guide
Copyright ©2025 Ridgeback Network Defense, Inc.
Welcome to the Ridgeback User Manual. Ridgeback is designed to bring order to the inherent chaos of modern networks, empowering organizations to manage and secure their IT, OT, and IoT environments effectively. This manual will guide you through the powerful capabilities of Ridgeback, enabling you to take full control of your network, reduce cyber risk, and ensure compliance with security best practices.
As networks become more complex, the need for more visibility and proactive defense mechanisms has never been greater. Whether you're an IT manager, sysadmin, security professional, or network engineer, Ridgeback equips you with the tools to identify unauthorized devices, disrupt network attackers, and provide fact-based risk reporting in real time.
This guide will walk you through Ridgeback's easy deployment process and its wide array of features, from real-time attack disruption to enhanced network segmentation validation. It is designed to serve both technical experts and decision-makers, making complex network insights accessible and actionable.
With Ridgeback, you are not just defending your network — you are gaining clarity, control, and confidence in your ability to respond to threats. Let this manual serve as your roadmap to maximizing the value Ridgeback can bring to your organization.
Why do I need another security tool if I'm doing fine?
Ridgeback helps you remove the chaos from your IT systems. Unlike other tools that add complexity and extra work, Ridgeback is designed to make your job easier, whether you're in networking, sysadmin, security, or management. It helps you work smarter, faster, and more efficiently.
Introduction and Overview
In a world where networks are becoming more intricate and the stakes for cybersecurity have never been higher, chaos reigns. IT managers, security professionals, network engineers, and sysadmins often find themselves staring at a digital landscape rife with uncertainty, their responsibilities fragmented across a field where one overlooked vulnerability can snowball into catastrophic consequences. Enter Ridgeback—a steadfast guardian in the turbulent realm of network security.
Imagine an IT manager named Alex. Each morning, he walks into his office, knowing that beyond the calm surface of monitors and blinking servers lies an ecosystem teeming with unseen risks. Rogue devices, unauthorized communications, and probing enemy scanners wait in the digital shadows, testing his defenses. With every beep of an alert, the question looms: Is today the day chaos breaks loose?
Ridgeback changes this story. For Alex, it becomes more than just a tool—it’s a sentinel. From the moment Ridgeback is integrated, the once invisible elements of the network spring into stark relief. Devices, be they IT, OT, or IoT, are visualized in real-time, giving Alex complete situational awareness 24/7. He no longer just reacts; he anticipates. The chaos that once strained his resources transforms into order, exposing vulnerabilities and allowing him to direct his team’s efforts where they matter most.
The benefits of Ridgeback aren’t limited to tech experts alone. Financial officers and board members gain access to fact-based risk reporting, empowering them to grasp complex security metrics in plain terms. The Ridgeback Risk Index demystifies the frequency and severity of potential threats, translating complex data into intuitive scores that inform strategy and spending. No longer is there a chasm between technical teams and decision-makers; Ridgeback’s insights bridge it with clarity.
And when attacks do strike, as they inevitably will, Ridgeback’s real-time attack disruption springs into action. Its virtual defenses activate like millions of hidden guardians, neutralizing intruders and disrupting malicious activity before damage spreads. Attackers find themselves not only stopped but discouraged, knowing Ridgeback makes future attempts fruitless.
For every network engineer confirming firewall efficacy or sysadmin combing for rogue hostname queries, Ridgeback is an ally. It tracks devices, uncovers unauthorized communications, and identifies machines communicating with non-existent services—all to ensure that defenders stay one step ahead.
Ridgeback doesn’t just guard networks; it fosters confidence. IT and security teams move from reactive to proactive, with newfound time and assurance to plan, innovate, and collaborate effectively with leaders. And as chaos subsides into order, the entire organization can breathe easier, knowing its infrastructure is fortified by a system that turns complex security management into a streamlined, resilient process.
In the end, Ridgeback isn’t just a tool. It’s a partner that stands vigilant, making real-time security insights simple, clear, and actionable—proving itself essential not just for today’s risks but for whatever challenges the future may bring.
Ridgeback Architecture
The Superadmin, Admin, and User
A superadmin account controls everything, an admin account controls an organization, and a user uses Ridgeback.
 A superadmin account manages admin accounts. Admin accounts manage user accounts.
An Rcore Covers a Network Segment
You only need one Rcore per network segment, or layer 2 broadcast domain. You can add multiple Rcores per segment for special coverage, but be sure there is no more than one Rcore per segment that is injecting traffic. Otherwise, the dogs will get into a fight.
 A single rcore can cover an entire layer 2 broadcast domain (network segment).
Service Containers Run Inside Docker
You pull an image from a container registry. Then you turn that image into a running service container.
 A service container is made with docker-compose.yml, .env, and a service image.
Services Provide Services
The primary service containers are:
- analytics: The analytics service generates useful metrics.
- enrichment: The enrichment service provices "enrichment" data to fuse with your data.
- manager: Rcores communicate with the manager service.
- policy: The policy service manages automation.
- server: This is what the web client connects to.
- surface: The surface service maps out the attack surface.
 Ridgeback is composed of many services.
Physical or Virtual
You can run an Rcore on physical or virtual computers.
 An rcore can be hardwired or wireless, physical or virtual.
Deployment Models
These are just a few deployment models to get started. These might be considered the most basic deployment models. More sophisticated deployment models are covered in advanced documention.
A Road Warrior with a Laptop
The most popular deployment model to get started is to place both the service containers and an Rcore on a single wireless laptop. This allows the user to take Ridgeback on the road and attach to any wireless network in an instant.
 All of Ridgeback can be installed on a wireless laptop.
More Fun than a Barrel of Laptops
Another popular deployment model is to have the service containers on one wireless laptop, and an Rcore on a different wireless laptop.
 Ridgeback can be installed across two wireless computers.
The Monolith
For small organizations that want to keep a Ridgeback server in the closet, putting the service containers and an Rcore on a single computer is an option.
 Ridgeback can be installed on a single wired computers.
Enterprise-Ready
Ready to scale up to the big time? Put the service containers on a server, and then put Rcores on other computers. Any computer running an Rcore, anywhere in the enterprise, can stream its data to the computer with the service containers. (The computer running the service containers can actually be anywhere, even in the cloud.)
 Ridgeback can be installed across two wired computers.
Data Collection and Storage Requirements
Ridgeback is designed to analyze network traffic metadata, ensuring user privacy by not examining or storing the actual content of network traffic. This approach allows organizations to gain insights into network behavior while maintaining data security and confidentiality.
Data Volume Per Endpoint
Ridgeback collects approximately 200 bytes of metadata per network event. The volume of collected data can be summarized as follows:
- Average Collection Rate: ~10 network events per endpoint per minute
- Daily Data Volume: ~14,400 network events per endpoint, totaling ~2.88MB per day
- Monthly Data Volume: ~86.4MB per endpoint
Data Volume for a Subnet (/24)
For a fully loaded /24 subnet (nominally 254 endpoints), the data storage requirements scale as follows:
- Monthly Data Estimate: ~22.118GB
- Conservative Storage Requirement: 25GB per /24 subnet, per month
These figures provide a conservative estimate for organizations planning data storage and infrastructure capacity to support Ridgeback's network traffic metadata analysis.
System Requirements
Ridgeback deploys in three parts:
-
The first part of deployment is a MySQL-compatible database. The database can be a standalone installation or the database can be run in a container if long-term data retention is not a requirement. The database gives you the ability to look back in time and perform forensics.
-
The second part of deployment is a collection of containers. The containers run various Ridgeback services. The containers make Ridgeback a portable and highly extensible solution.
-
The third part of deployment is one Rcore per network segment that you wish to protect with Ridgeback. An Rcore is a small executable that handles reading data from and writing data to a network segment. The Rcore allows Ridgeback to work in most environments, including environments with significant operational technology (OT) and environments with significant personal devices, such as cell phones and tablets.
System Requirements for a Database
Ridgeback requires a MySQL-compatible database. A standard Ridgeback installation provides the option of loading a MariaDB database into a container for short-term data storage. The database-in-a-container option is not suitable when long-term data retention is a requirement.
Some other (external) database options are listed below.
- MySQL Standard Edition:
https://www.mysql.com/products/standard/ - MySQL Enterprise Edition:
https://www.mysql.com/products/enterprise/ - MariaDB:
https://mariadb.com/kb/en/getting-installing-and-upgrading-mariadb/ - Azure Database for MySQL:
https://azure.microsoft.com/en-us/products/mysql/ - Amazon RDS for MySQL:
https://aws.amazon.com/rds/mysql/ - MySQL (version 5.7 for Windows, macOS, Linux, and Solaris):
https://dev.mysql.com/doc/mysql-installation-excerpt/5.7/en/
The database will accumulate data about your IT infrastructure. You should implement backup and data pruning procedures according to the data retention policies at your organization.
System Requirements for Container Services
Ridgeback services run as containers. Before installing the Ridgeback services, you need to have a computer set up to run containers. Some options for a container runtime are listed below.
- Docker Desktop on Windows:
https://docs.docker.com/desktop/install/windows-install/ - Docker Desktop on Mac:
https://docs.docker.com/desktop/install/mac-install/ - Docker Desktop on Linux:
https://docs.docker.com/desktop/install/linux-install/ - Linux Containers (LXC):
https://linuxcontainers.org/lxc/getting-started/ - Mirantis Container Runtime:
https://www.mirantis.com/blog/getting-started-with-mirantis-container-runtime-on-windows-server/
The images for the Ridgeback services are less than 3.5GB in size (combined) and use Linux on the inside. (This is why Docker on Windows needs WSL installed.)
The containers will generate application logs. You should configure your container runtime environment to retain and purge logs according to the log retention policies at your organization.
The computer hosting the containers should have an IP route to the Ridgeback license server, which is license.ridgebacknet.com.
System Requirements for an Rcore Computer
Ridgeback uses a single Rcore per network segment. An Rcore is a small executable that handles reading data from and writing data to a network segment. The minimum system requirements for an Rcore version 3.x are listed below.
Windows Requirements (for an Rcore)
- Windows 11 64-bit: Home or Pro version 21H2 or higher, or Enterprise or Education version 21H2 or higher.
- Windows 10 64-bit: Home or Pro 21H1 (build 19043) or higher, or Enterprise or Education 20H2 (build 19042) or higher.
- A 64-bit processor with at least 2 cores.
- At least 4GB system memory.
- The latest version of the Npcap driver must be installed prior to installing the Rcore.
https://npcap.com/#download
Mac Requirements (for an Rcore)
- macOS version 14.6 (Sonoma) or higher.
- Intel or ARM (M1, M2, M3, M4) CPU.
- At least 4GB system memory.
Linux Requirements (for an Rcore)
- Debian, Ubuntu, or other free distribution. (Ridgeback does not support CentOS.)
- Intel or ARM CPU. (Ridgeback should work on a Raspberry Pi 4 or 5.)
- At least 4GB system memory.
Every computer running an Rcore needs an IP route to the computer hosting the Ridgeback services. An Rcore will only operate if the computer that hosts it is turned on, awake, and connected to the network.
Common Use Cases
This section covers fundamental use cases that help users leverage Ridgeback effectively. Each of these use cases not only optimizes network reliability but also bolsters security, forming a comprehensive approach to network health and integrity.
Each of these use cases supports both the reliability and security of a network by addressing potential risks, improving visibility, and reinforcing policy compliance. By implementing Ridgeback in these scenarios, organizations can enhance their ability to detect and mitigate threats while maintaining an efficient, well-regulated network environment.
Ridgeback is a versatile tool with numerous applications tailored to fit the unique needs of any network setup. While the following common use cases provide an excellent starting point, Ridgeback’s adaptability allows it to address a virtually limitless range of scenarios based on your network’s architecture and specific requirements.
Reconcile or Audit DNS Entries
Why it matters: Regularly reconciling and auditing DNS entries is crucial for identifying discrepancies between expected and actual DNS configurations. Misconfigured or outdated DNS entries can lead to traffic misdirection, system failures, or potential exposure to attackers exploiting subdomain takeovers. Ridgeback's metadata analysis helps verify that DNS activity aligns with approved entries, ensuring that network resources are correctly routed and protected from exploitation.
Eliminate Insecure Hostname Queries (e.g., LLMNR or mDNS Requests)
Why it matters: Hostname resolution protocols like Link-Local Multicast Name Resolution (LLMNR) and multicast DNS (mDNS) can be leveraged by attackers to perform man-in-the-middle attacks or gather network intelligence. These insecure queries often occur unintentionally and can lead to potential vulnerabilities. By detecting and eliminating such queries, Ridgeback reduces attack vectors, ensuring a more secure and streamlined network resolution process.
Eliminate Reconnaissance Threats (Basic Endpoint Enumeration)
Why it matters: Network reconnaissance is a common initial phase in cyber-attacks, where attackers map out endpoints and network architecture to identify targets. By analyzing network traffic for signs of unauthorized enumeration activities, Ridgeback can help prevent attackers from gaining critical insight into the network's structure. This enhances security by disrupting the early stages of an attack, making it significantly harder for potential intruders to plan their strategies.
Eliminate Active Threats (Attempts to Exchange Data with Unused Endpoints)
Why it matters: Detecting communication attempts directed at unused or unallocated IP addresses can indicate the presence of active probing or unauthorized data exchange attempts. Such attempts can be exploited by attackers to uncover vulnerabilities within the network. These endpoints, if improperly configured or overlooked, may serve as footholds for exploitation, allowing attackers to initiate malicious activity or breach network defenses. Ridgeback helps identify and block these activities, ensuring that suspicious traffic is flagged and mitigated promptly. This not only protects against potential data exfiltration but also highlights areas where network policy enforcement may need to be strengthened. By addressing these vulnerabilities, organizations can reinforce their security posture and reduce the risk of exploitation through unused network assets.
Eliminate Unused or Unapproved Services
Why it matters: Running unused or unapproved services on the network can expose vulnerabilities and provide attackers with entry points. Such services often go unnoticed and can be exploited if not properly managed. Ridgeback helps detect unexpected or unauthorized services, enabling network administrators to decommission them and maintain a streamlined, secure network environment. This also aids in reducing the attack surface and optimizing resource allocation.
Detect Data Leakage Between Network Segments
Why it matters: Data leakage between segmented network areas can undermine security strategies designed to compartmentalize and protect sensitive data. Ridgeback's ability to monitor network metadata helps identify unintentional or unauthorized data transfers between these segments, allowing for quick response to prevent potential breaches. Maintaining proper data flow segmentation ensures compliance with security policies and reduces the risk of sensitive data exposure.
Identify and Remove Unauthorized Devices
Why it matters: Unauthorized devices on a network can act as entry points for attackers or introduce vulnerabilities. Such devices can bypass traditional security measures and pose significant risks if they are compromised. Ridgeback aids in identifying these devices by analyzing network activity for unknown or rogue devices attempting to communicate within the network. Removing or quarantining these unauthorized devices strengthens the overall security posture and ensures only approved devices have access.
Audit DNS Entries
Auditing DNS entries is a fundamental practice for maintaining the security and reliability of any network. This chapter covers the essentials of authoritative nameservers, why they matter, how Ridgeback can help audit both forward and reverse DNS records, and guidance for setting up nameservers on Windows and Linux systems.
This chapter provides a foundation for auditing DNS entries with Ridgeback and configuring authoritative nameservers to support network reliability and security. This chapter is not meant to be a comprehensive treaty on DNS, but instead is something to get you started using DNS in your network.
Authoritative Nameservers
Definition: An authoritative nameserver holds the definitive records for a domain and responds to DNS queries with the most accurate information. Unlike caching or recursive nameservers that query other servers to resolve DNS requests, authoritative nameservers provide direct answers for domains they manage.
Types of Authoritative Nameservers:
- Primary (Master) Nameserver: The main server that holds the original zone records for a domain.
- Secondary (Slave) Nameserver: A backup server that obtains zone records from the primary server and can respond to queries if the primary server becomes unavailable.
Why Is an Authoritative Nameserver Important?
Authoritative nameservers play a critical role in DNS infrastructure:
- Reliability: They ensure DNS queries—both forward lookups (A/AAAA) and reverse lookups (PTR)—are answered promptly and accurately, supporting the network’s reliability.
- Security: Properly configured authoritative nameservers help prevent DNS-based attacks, such as cache poisoning, spoofing, and unauthorized reverse record tampering.
- Compliance: Auditing DNS entries, including reverse zones, can help maintain compliance with security standards and regulatory requirements.
- Redundancy: Secondary authoritative nameservers add a layer of resilience, ensuring domain availability even if the primary server fails.
Using Ridgeback to Audit DNS Records
Ridgeback offers powerful tools for auditing both forward and reverse DNS entries:
- Identify Discrepancies: Ensure A/AAAA and PTR records align—no orphaned forward entries without matching reverse, and vice versa.
- Detect Unauthorized Changes: Monitor for unexpected modifications to both forward and reverse zone files that could enable spoofing or mail-delivery issues.
- Enhance Visibility: Gain insights into DNS resolution patterns, including applications relying on reverse lookups (e.g., mail servers, logging systems).
- Strengthen Security Posture: Use metadata analysis to spot unusual reverse-DNS queries that may indicate reconnaissance or attack preparation.
How Ridgeback Works: Ridgeback collects and analyzes network traffic metadata—forward queries, reverse queries, and record changes—without storing actual packet contents. This allows administrators to validate that both forward and reverse DNS entries are functioning as intended and to spot anomalies efficiently.
Setting Up a Nameserver on Windows
Prerequisites:
- Windows Server installed.
- Access to Server Manager.
Steps:
-
Install the DNS Server Role
- Open Server Manager and navigate to Manage > Add Roles and Features.
- Select DNS Server and follow the installation prompts.
-
Configure the Forward Lookup Zone
- Open DNS Manager from Tools in Server Manager.
- Right-click Forward Lookup Zones and select New Zone.
- Choose Primary Zone, specify the domain name (e.g.,
example.com), and finish the wizard. - Right-click your new zone, choose New Host (A or AAAA) to add host records.
-
Configure the Reverse Lookup Zone
- In DNS Manager, right-click Reverse Lookup Zones and select New Zone.
- Choose Primary Zone, select IPv4 (or IPv6), and enter your network ID (e.g.,
192.168.1). - Specify the zone file name (e.g.,
1.168.192.in-addr.arpa) and finish the wizard. - Right-click the new reverse zone and select New Pointer (PTR). Enter the IP’s last octet and map it to the hostname.
-
Verify Configuration
- Open PowerShell or Command Prompt and run:
nslookup 192.168.1.1 - Confirm it returns the correct PTR record.
- Open PowerShell or Command Prompt and run:
Setting Up a Nameserver on Linux
Prerequisites:
- A Linux server with root or sudo access.
- Bind9 (or similar DNS server software) installed.
Steps:
-
Install Bind9
- Debian/Ubuntu:
sudo apt-get install bind9 - CentOS/RHEL:
sudo yum install bind
- Debian/Ubuntu:
-
Configure the DNS Server
-
Edit
/etc/bind/named.conf.localto add your forward and reverse zones:zone "example.com" { type master; file "/etc/bind/zones/example.com.zone"; }; zone "1.168.192.in-addr.arpa" { type master; file "/etc/bind/zones/1.168.192.in-addr.arpa.zone"; };
-
-
Create the Forward Zone File
-
Path:
/etc/bind/zones/example.com.zone -
Contents:
$TTL 86400
@   IN  SOA     ns1.example.com. admin.example.com. (
              2023110601 ; Serial
              3600       ; Refresh
              1800       ; Retry
              604800     ; Expire
              86400 )    ; Minimum TTL
@   IN  NS      ns1.example.com.
ns1 IN  A       192.168.1.1
www IN  A       192.168.1.10
-
-
Create the Reverse Zone File
-
Path:
/etc/bind/zones/1.168.192.in-addr.arpa.zone -
Contents:
$TTL 86400
@   IN  SOA     ns1.example.com. admin.example.com. (
              2023110601 ; Serial
              3600       ; Refresh
              1800       ; Retry
              604800     ; Expire
              86400 )    ; Minimum TTL
    IN  NS      ns1.example.com.
1   IN  PTR     ns1.example.com.
10  IN  PTR     www.example.com.
-
-
Restart and Verify
- Restart Bind9:
sudo systemctl restart bind9 - Test forward lookup:
dig @localhost example.com A - Test reverse lookup:
dig @localhost -x 192.168.1.1 PTR
- Restart Bind9:
With forward and reverse zones properly configured—and Ridgeback’s auditing capabilities—you’ll maintain accurate DNS mappings, improve network security, and ensure seamless hostname and IP resolution across your infrastructure.
Identify and Eliminate Insecure Hostname Queries
Hostname queries are an essential part of network communication, but not all methods for hostname resolution are secure. This chapter covers what insecure hostname queries are, how adversaries can exploit them, and steps for blocking these vulnerabilities to safeguard your network.
What Is an Insecure Hostname Query?
Definition: Insecure hostname queries are resolution methods that can be exploited by attackers due to their broadcast nature or lack of strong security measures. Two common types of insecure hostname queries are Link-Local Multicast Name Resolution (LLMNR) and Multicast DNS (mDNS):
- LLMNR: A protocol used to resolve hostnames when DNS is not available. It operates on a local network by broadcasting hostname requests.
- mDNS: Similar to LLMNR but primarily used in home or small office networks. It resolves hostnames by multicasting queries to other devices on the same local network.
Why These Protocols Are Considered Insecure:
- Lack of Authentication: LLMNR and mDNS do not have strong built-in authentication, allowing attackers to respond to hostname queries with malicious IP addresses.
- Broadcast Communication: They broadcast requests to all devices on the local network, which can easily be intercepted or spoofed.
- Man-in-the-Middle Potential: Attackers can impersonate legitimate devices and redirect traffic to malicious endpoints, leading to data interception or unauthorized access.
How Adversaries Use Insecure Hostname Queries
Attackers leverage insecure hostname queries in various ways to compromise networks:
- Responder Attacks: In this common method, attackers use tools like Responder to poison LLMNR or mDNS queries. When a device broadcasts a request for a hostname, the tool tricks the device into believing that the attacker's system is the requested resource. This enables attackers to capture credentials or reroute traffic.
- Credential Theft: By spoofing legitimate responses, attackers can trick users into sending their login details, which are then harvested for later use in more advanced attacks.
- Network Mapping and Reconnaissance: Adversaries can use the responses from LLMNR and mDNS to gather information about the devices and services available on the network, building a blueprint of the network structure to identify potential targets.
- Downgrade Attacks: Attackers may force a client to use an insecure hostname resolution method by disrupting standard DNS services, creating an opportunity to intercept communications.
How to Block Insecure Hostname Queries
Blocking or mitigating insecure hostname queries helps strengthen network security. Here’s how to do it:
A. On Windows Systems
- Disable LLMNR:
- Use Group Policy to disable LLMNR across the domain:
- Open Group Policy Management and create or edit an existing GPO.
- Navigate to Computer Configuration > Administrative Templates > Network > DNS Client.
- Set Turn off multicast name resolution to Enabled.
- Use Group Policy to disable LLMNR across the domain:
- Disable mDNS:
- There is no direct Group Policy for mDNS, but you can use PowerShell or registry tweaks to disable specific services that utilize mDNS.
B. On Linux Systems
-
Disable LLMNR:
- For systems using systemd-resolved, add or edit the configuration in
/etc/systemd/resolved.conf:[Resolve] LLMNR=no MulticastDNS=no - Restart the service with
sudo systemctl restart systemd-resolved.
- For systems using systemd-resolved, add or edit the configuration in
-
Disable mDNS:
- If avahi-daemon is installed (commonly used for mDNS services), stop and disable it:
sudo systemctl stop avahi-daemon
sudo systemctl disable avahi-daemon
- If avahi-daemon is installed (commonly used for mDNS services), stop and disable it:
C. Network-Level Mitigation
- Network Segmentation: Use VLANs or network segmentation to isolate groups of devices that do not need to communicate via LLMNR or mDNS.
- Firewall Rules: Block multicast traffic related to LLMNR and mDNS at the network perimeter. Specifically:
- Block UDP traffic on port 5353 (mDNS) and port 5355 (LLMNR).
D. Leverage Ridgeback for Detection and Prevention
- Monitor Network Traffic: Ridgeback analyzes network metadata to identify patterns that indicate LLMNR or mDNS queries. This helps network administrators spot unusual or potentially malicious activity.
- Alerting and Reporting: Ridgeback can be configured to alert administrators when insecure hostname queries are detected, allowing for swift action.
- Policy Enforcement: Use Ridgeback's insights to enforce stricter network policies and reduce reliance on insecure protocols, enhancing your overall security posture.
Conclusion
Identifying and eliminating insecure hostname queries is a crucial step in protecting your network from credential theft, unauthorized access, and other malicious activities. By disabling LLMNR and mDNS, employing network-level controls, and using tools like Ridgeback to monitor traffic, you can significantly reduce the attack surface and improve the resilience of your network infrastructure.
Identify and Eliminate Reconnaissance Threats
Reconnaissance threats are among the earliest stages of cyber-attacks, where adversaries attempt to map out network architecture and identify potential targets. Understanding and addressing these threats is essential for maintaining network security and resilience.
What Is a Recon Threat?
Definition: A reconnaissance (recon) threat refers to any activity or attempt to gather information about endpoints or network structure for the purpose of identifying vulnerabilities. This activity can be performed by both friendly and potentially harmful actors, ranging from legitimate network devices to adversaries with malicious intent.
What Is Reconnaissance?
Reconnaissance is the process of scanning or probing a network to collect information about active devices, their services, open ports, IP addresses, and network topology. It is a preliminary phase in which data is collected to understand the structure and weaknesses of a network.
Types of Reconnaissance:
- Passive Reconnaissance: Involves monitoring network traffic or gathering information without actively engaging with the network (e.g., sniffing network traffic).
- Active Reconnaissance: Entails direct interaction with network components, such as ping sweeps, port scanning, or service enumeration.
Why Do Friendly Devices Conduct Reconnaissance?
Friendly reconnaissance refers to legitimate network devices performing scans or queries for beneficial reasons, such as:
- Network Discovery: Devices such as routers, printers, or administrative systems often perform network discovery to identify available resources or validate connectivity.
- Service Location: Systems might need to locate services such as DHCP servers or network printers.
- Health Checks: Monitoring tools and software agents may scan endpoints to ensure devices are functioning properly and meet compliance standards.
Example: An IT management system regularly pings or scans devices to verify availability and uptime, facilitating maintenance and troubleshooting.
Why Do Frenemy Devices Conduct Reconnaissance?
Frenemy devices are devices that aren't inherently malicious but may conduct reconnaissance in ways that can create vulnerabilities or raise security concerns. Examples include:
- Smart TVs and IoT Devices: These devices often conduct discovery to connect with other smart devices or update their network maps. While their intentions may be benign, poorly secured devices can be manipulated or compromised to perform unwanted network scanning.
- Printers and VoIP Systems: Such devices might broadcast queries to identify connected endpoints, which could lead to unintentional exposure of network details if improperly configured.
Why It Matters: Although these devices may not be acting with malicious intent, their network behavior can open pathways for exploitation if attackers gain control over them.
Why Do Adversaries Conduct Reconnaissance?
Adversaries conduct reconnaissance for several strategic reasons:
- Identifying Vulnerabilities: Attackers use recon activities to identify unpatched systems, open ports, and vulnerable services that can be exploited.
- Mapping Network Topology: Understanding the layout of the network helps attackers pinpoint high-value targets and plan subsequent attack phases.
- Credential Harvesting: Reconnaissance can reveal weaknesses in user authentication processes or reveal unprotected credential exchanges.
Example: An attacker might use tools such as Nmap to scan for active devices and open ports, providing the initial groundwork for an exploitation attempt.
How to Accommodate Friendly Reconnaissance
Accommodating friendly reconnaissance ensures that legitimate network scans can continue to support business needs without exposing the network to undue risk:
- Device Whitelisting: Configure Ridgeback or network monitoring tools to recognize and allow expected queries from trusted devices.
- Scheduled Scans: Use scheduled or periodic scans that are monitored and approved to reduce noise and avoid false positives.
- Network Segmentation: Isolate devices that conduct regular discovery in controlled subnets to limit their scope and exposure.
Best Practice: Use access controls to ensure that only authenticated and approved devices can perform network queries.
How to Block Unfriendly Reconnaissance
Blocking unfriendly reconnaissance is critical to preventing attackers from gathering intelligence on your network:
A. Use Network Security Tools
- Intrusion Detection and Prevention Systems (IDPS): Deploy IDPS tools that can identify and block scanning activity, such as port scans or unusual bursts of ICMP traffic.
- Firewalls: Configure firewall rules to limit unnecessary traffic and prevent unauthorized devices from probing your network.
- Ridgeback: Leverage Ridgeback’s capabilities to monitor network traffic metadata for signs of unauthorized enumeration attempts and alert administrators in real-time.
B. Implement Network Access Controls
- Restrict Network Access: Limit access to sensitive parts of the network based on the principle of least privilege.
- MAC Address Filtering: Use MAC address filtering to restrict which devices can communicate on the network. There are advanced methods to use Ridgeback for network access control (NAC).
- Zero Trust Architecture: Adopt a zero-trust approach that authenticates and authorizes every device and connection request. There are advanced methods to use Ridgeback to implement zero trust policies appropriate for your network.
C. Employ Network Obfuscation Techniques
- Ridgeback: Use Ridgeback phantoms to overwhelm and entangle unauthorize reconnaissance processes.
- Honeypots and Decoy Systems: Deploy honeypots that mimic legitimate network assets to detect and divert malicious reconnaissance.
- Network Address Translation (NAT): Use NAT to obscure internal IP addresses and make endpoint enumeration more challenging for potential attackers.
Conclusion
Reconnaissance threats pose a significant risk to network security, serving as the precursor to more advanced attacks. While legitimate devices may perform necessary scans and queries, distinguishing between friendly, frenemy, and adversarial reconnaissance is essential for maintaining a secure network. By accommodating beneficial scans, restricting unwanted probing, and employing advanced monitoring tools like Ridgeback, you can build a network that is both functional and resilient against recon threats.
Identify and Eliminate Active Threats
Active threats can signal an immediate and ongoing attempt to compromise a network. They often involve attempts to initiate communication with IP addresses or ports that are not in use, a behavior that can indicate probing, misconfiguration, or even the early stages of an attack. This chapter explores active threats in detail, their implications, and effective strategies for investigation and mitigation.
What Is an Active Threat?
Definition: An active threat refers to any attempt to initiate a TCP connection to an IP address or port that is currently not in use. These connection attempts can signal probing activity or an effort to exploit network vulnerabilities. While not all active threats are inherently malicious, they should be scrutinized to ensure network integrity.
Examples of Active Threats:
- Unauthorized port scanning.
- Repeated attempts to connect to unused IP addresses.
- Attempts to communicate with closed or restricted services.
How Do Adversaries Exploit Active Threats?
Exploitation of active threats typically occurs in the early stages of an attack. Adversaries use these methods to:
- Map Network Vulnerabilities: Attackers attempt connections to various IPs and ports to identify potential entry points or unpatched services.
- Test for Misconfigurations: Probes help attackers find weaknesses, such as forgotten or improperly secured ports.
- Launch Exploitation Campaigns: Once an attacker finds an open, unused, or misconfigured endpoint, they may deploy payloads to compromise the target.
Example: An attacker might use automated tools such as Nmap or Masscan to scan a range of IPs and ports for services that can be exploited.
How Would Friendly Devices Become an Active Threat?
Friendly devices can sometimes behave like active threats due to misconfigurations or legitimate tasks:
- Misconfigured Services: Devices or applications that are improperly set up may attempt to reach unused or non-existent IP addresses or ports.
- Scheduled Scanning: Network security tools and vulnerability scanners might perform automated scans that trigger alerts as potential threats.
- Outdated Software: Legacy systems or old software versions may have configurations that cause them to behave unpredictably, attempting unnecessary connections.
Example: An internal monitoring tool configured with incorrect IP ranges might attempt to connect repeatedly to unused endpoints, appearing as an active threat to network monitoring systems.
How to Investigate an Active Threat
Proper investigation of active threats is essential to differentiate between benign activities and real threats:
- Log Analysis: Examine firewall and network logs to trace the origin of the suspicious connection attempts.
- Network Traffic Monitoring: Use tools such as Ridgeback to analyze the metadata of connection attempts and identify patterns that indicate malicious intent.
- Device Identification: Identify the source device or system initiating the connection to understand whether it’s a friendly device, a misconfiguration, or a potential intruder.
Best Practice: Ensure that threat investigation procedures are documented and that incident response teams are trained to recognize common signatures of active threats.
Repairing Misconfigurations
If an active threat is found to be caused by a legitimate device or system, take the following steps:
- Reconfigure Systems: Correct any network misconfigurations, such as incorrect IP ranges in scanning tools or services reaching out to obsolete endpoints.
- Patch and Update: Ensure that all systems are updated with the latest security patches to mitigate the risk of unexpected behaviors.
- Remove Redundant Services: Disable or remove any legacy services that are no longer required but may still be attempting connections.
How to Accommodate a Friendly Vulnerability Scanner
Friendly vulnerability scanners play an essential role in proactively identifying weaknesses, but they must be managed to avoid appearing as active threats:
- Define IP Ranges and Rules: Clearly define the IP ranges that the scanner can target and establish rules that prevent scans from probing outside approved network boundaries.
- Whitelist Devices: Configure network monitoring tools, such as Ridgeback, to recognize and accommodate scans from approved scanners without flagging them as threats.
- Schedule Scans: Conduct vulnerability scans during predefined maintenance windows to minimize the impact on network traffic and avoid false alarms.
How to Eliminate Active Threats
To effectively eliminate active threats from your network, consider the following measures:
A. Use Network Monitoring Tools
- Ridgeback: Employ Ridgeback to continuously monitor for suspicious connection attempts to unused IPs and ports. Its metadata analysis can detect and alert on these activities in real time.
- Intrusion Detection Systems (IDS): Deploy IDS tools to identify active threat patterns and raise alerts for deeper investigation.
B. Implement Network Access Controls
- Firewall Configurations: Strengthen firewall rules to block unauthorized connection attempts and log incidents for analysis.
- Access Lists: Use access control lists (ACLs) to restrict which devices or networks are allowed to communicate with specific parts of your network.
- Segmentation: Segment your network to limit the spread of any unauthorized connection attempts and contain potential threats.
C. Strengthen Device and Application Security
- Authentication and Authorization: Ensure all devices and applications authenticate before attempting connections.
- Regular Updates and Patching: Keep devices and software up to date to prevent vulnerabilities that may lead to active threat activity.
- Network Scanning: Use internal scanning tools to proactively identify open or unused ports and services that need to be closed or secured.
Conclusion
Identifying and eliminating active threats is essential to protecting your network from potential exploitation. By understanding the sources and motivations behind these connection attempts, whether friendly or malicious, network administrators can take informed action. Through diligent monitoring, timely investigation, and robust configuration, you can mitigate active threats and fortify your network’s security posture.
Identify and Eliminate Unapproved Services
Unapproved or unauthorized services running on a network can create significant security risks. This chapter explains what services are, how they can increase risk, how to audit services in use, and how to shut down those that are unapproved. It also includes guidance on using source ports to trace the initiating process behind a service.
What Are Services?
Definition: Services refer to background processes or programs that run continuously to provide various functionalities on a system or network. These services are essential for enabling applications and ensuring smooth operations within an organization’s network.
Examples of Common Services:
- Web Services (HTTP/HTTPS): Allow web applications to run and communicate.
- File Transfer Services (FTP/SFTP): Facilitate the transfer of files between systems.
- Database Services (SQL Server, MySQL): Manage data storage and retrieval for applications.
- Remote Access Services (RDP, SSH): Provide remote access capabilities for system administration.
How Do Services Increase Risk?
Unapproved or poorly managed services can increase the risk of exploitation:
- Increased Attack Surface: Every active service adds a potential entry point into the network. Unnecessary or insecure services enlarge the network’s overall attack surface.
- Outdated and Unpatched Services: Unmonitored services can become outdated and vulnerable to exploits.
- Misconfigurations: Improper configurations can expose data or grant unauthorized access.
- Hidden Services: Undocumented services can provide covert entry points for attackers to maintain persistence within a network.
Real-World Example: A forgotten test web server running on a non-standard port with default credentials could be exploited for administrative access.
How to Audit the Services in Use
Auditing services helps identify which processes are running and whether they are approved:
Steps for Auditing Services:
-
Inventory Services: Use tools like Ridgeback to identify services running across your network.
-
Categorize and Evaluate: Classify services as essential, approved but non-essential, or unapproved.
-
Check Versions and Updates: Cross-check versions of running services with known vulnerabilities and patch requirements.
-
Trace Initiating Processes by Source Port:
-
On Windows:
- Use
netstat -anoto display active connections along with their source ports and associated process IDs (PIDs). - Use
tasklist /fi "PID eq <PID>"to identify the process by its PID. - For more detailed insight, use PowerShell:
Match theGet-NetTCPConnection | Where-Object { $_.State -eq 'Listen' } | Select-Object -Property LocalPort, OwningProcessOwningProcesswith thePIDintasklist.
- Use
-
On Linux:
- Use
ss -tulnpornetstat -tulnpto display listening ports, protocols, and associated PIDs. - Use
ps -p <PID> -o comm,argsto get details about the process and its command-line arguments. - Tools like
lsof -i :<port_number>can also be used to trace the process using a specific port.
- Use
-
Tools to Use:
- Ridgeback: Provides real-time network insights and helps identify services.
- Network Scanners (e.g., Nmap): Detect open ports and the services behind them.
- Local System Tools:
tasklist,ss, andlsoffor tracing PIDs and processes.
How to Shut Down Unapproved Services
Once unapproved services are identified, it’s important to shut them down securely:
Steps to Shut Down Unapproved Services:
- Confirm and Document: Verify the nature of the unapproved service and document its details (name, machine, and process ID).
- Coordinate with Stakeholders: Notify relevant teams before shutting down services that may impact other applications.
- Disable the Service:
- On Windows: Open
services.msc, locate the service, stop it, and set its Startup Type to Disabled. - On Linux: Use
systemctl stop <service_name>andsystemctl disable <service_name>to stop and prevent the service from starting at boot.
- On Windows: Open
- Kill Processes by PID:
- On Windows: Use
taskkill /PID <PID> /Fto forcefully terminate a process. - On Linux: Use
kill <PID>orkill -9 <PID>for forceful termination.
- On Windows: Use
- Remove or Secure: Uninstall unapproved services or reconfigure necessary ones with stronger security measures.
- Monitor for Recurrence: Implement continuous monitoring to ensure unapproved services do not reappear.
Preventative Measures:
- Network Policies: Establish clear policies outlining approved services and conditions for running them.
- Change Management: Implement a change management process to ensure services are reviewed before deployment.
- Access Controls: Restrict who can install or start services on key systems.
Conclusion
Regularly auditing and eliminating unapproved services is essential for reducing the network’s attack surface and enhancing security. Leveraging tools to trace initiating processes by source port can provide additional insight into the services running in your network. With diligent monitoring, informed action, and comprehensive policies, you can safeguard your network from unauthorized services.
Detect and Correct Leaky Segments
Network segmentation is a foundational practice in cybersecurity, designed to compartmentalize a network into manageable sections for improved security and performance. However, even well-segmented networks can experience unintended data leakage between segments, posing potential security and compliance risks. This chapter outlines how to detect and correct leaky segments in a network.
What Is a Network Segment?
Definition: A network segment is a portion of a network that is isolated or partitioned from other segments. Each segment functions as its own subnetwork with controlled communication pathways. Segmentation helps control the flow of traffic between different parts of a network and ensures that devices and data within one segment do not freely interact with another unless explicitly permitted.
Types of Network Segments:
- Physical Segments: Created using separate switches, routers, or dedicated cabling.
- Virtual Segments (VLANs): Logical segments configured within a single physical network infrastructure.
- Application Segments: Segmented based on applications or data flow rather than physical boundaries, often used in cloud environments.
Why Is Segmentation Important?
Key Benefits:
- Improved Security: Limits the spread of malware or unauthorized access by containing breaches within a single segment.
- Performance Optimization: Reduces traffic loads by controlling the flow between segments, leading to more efficient network operation.
- Regulatory Compliance: Helps organizations meet industry regulations by isolating sensitive data or systems from less secure segments.
- Enhanced Monitoring: Simplifies network monitoring by allowing focused observation of specific segments.
Example: A well-segmented network ensures that a breach in a guest Wi-Fi network does not grant an attacker access to internal business systems or sensitive data.
How to Detect Data Leakage Between Segments
Detecting data leakage between network segments is essential for maintaining network integrity and preventing unauthorized access to sensitive data.
Methods to Detect Leakage:
- Monitor Traffic Patterns:
- Use tools like Ridgeback to monitor network traffic and detect unusual data flows between segments. Ridgeback's metadata analysis helps pinpoint data exchanges that shouldn't occur, such as confidential data moving from a secure segment to a less secure one.
- Network Flow Analysis:
- Utilize network flow analysis tools (e.g., NetFlow, sFlow) to observe traffic patterns and identify unexpected data transfers between segments.
- Firewall and IDS/IPS Logs:
- Review logs from firewalls and intrusion detection/prevention systems to identify traffic that bypasses set policies or segments.
- Access Control Review:
- Regularly review access control lists (ACLs) to ensure that only authorized communications are allowed between segments.
- Packet Capture and Analysis:
- Use packet capture tools like Wireshark for a deeper investigation if data leakage is suspected. Analyze packet headers to identify traffic crossing boundaries without appropriate permissions.
Signs of Data Leakage:
- Unexpected Data Transfers: Traffic between a secure and less secure segment that isn't accounted for in network policy.
- Abnormal Bandwidth Usage: Unusual spikes in data flow between segments.
- Unauthorized Protocols: The use of protocols that shouldn't be allowed between segments, such as FTP traffic between a restricted segment and a public-facing segment.
How to Correct Segment Leakage
Once a leaky segment has been identified, immediate action is needed to correct the issue and prevent potential data breaches:
Steps to Correct Segment Leakage:
- Identify the Source and Destination:
- Determine which systems are involved in the data transfer and trace the pathways that allowed the leakage to occur.
- Adjust Network Policies:
- Modify ACLs and firewall rules to restrict unauthorized traffic between segments. Ensure that only required communication pathways are open.
- Enhance Segmentation Boundaries:
- Strengthen segmentation by implementing more granular controls such as microsegmentation, which limits communication even within the same broader segment.
- Patch and Update Systems:
- Ensure that all devices, firewalls, and software involved in segment control are up to date to close any vulnerabilities that may be contributing to leakage.
- Implement Zero Trust Principles:
- Adopt a zero-trust approach to further limit segment interactions. This requires continuous verification for devices and users attempting to access resources across segments.
- Use Encryption and VPNs:
- Encrypt traffic between segments to protect data integrity and confidentiality if data flow is necessary between segments with varying security levels.
- Continuous Monitoring:
- Establish continuous monitoring practices using tools like Ridgeback to ensure that corrections have been effective and to catch any new instances of leakage early.
Example Scenario: An internal segment used for HR services is inadvertently connected to a guest Wi-Fi network. Corrective action involves tightening firewall rules, verifying that VLANs are properly configured, and ensuring the guest network cannot route traffic to the HR segment.
Best Practices for Maintaining Segment Integrity
- Routine Audits: Regularly audit network segmentation policies and configurations to ensure they align with business and security requirements.
- Training and Awareness: Train IT and network staff on segmentation policies and the importance of keeping these configurations secure.
- Automated Alerts: Set up automated alerts for traffic anomalies that indicate potential segment leakage, allowing for a rapid response.
Conclusion
Detecting and correcting leaky network segments is vital to maintaining network security and ensuring that segmentation serves its purpose effectively. With tools like Ridgeback for continuous monitoring and best practices in place for policy management, organizations can prevent unauthorized data flows, protect sensitive information, and maintain a secure and compliant network infrastructure.
Identify Unauthorized Devices
Knowing what’s in your network is essential for effective management and security. Unauthorized devices can introduce significant risks, including data breaches and network vulnerabilities. This chapter discusses the importance of asset management and how Ridgeback can be used to audit IT assets effectively.
What's in Your Network?
Networks today can host a wide array of devices, from workstations and servers to IoT devices, mobile devices, and rogue hardware. Each device represents a potential entry point or vulnerability. Unauthorized or unknown devices can bypass security measures, leading to data breaches, unauthorized access, and other security incidents.
The Importance of Proper Asset Management
Asset management is the practice of tracking and managing all devices connected to a network. This includes identifying what devices are present, ensuring they are approved for network use, and monitoring their behavior. Here’s why asset management is critical:
1. Security:
- Prevent Unauthorized Access: Unauthorized devices can serve as entry points for attackers, allowing them to bypass traditional network defenses.
- Mitigate Insider Threats: Employees or malicious insiders may introduce unauthorized devices to exfiltrate data or disrupt operations.
- Reduce Attack Surface: By identifying and removing unauthorized devices, you reduce the number of potential vulnerabilities that attackers can exploit.
2. Compliance:
- Regulatory Requirements: Many regulatory standards, such as GDPR, HIPAA, and PCI DSS, require organizations to maintain an inventory of all connected devices to ensure data protection.
- Audit Readiness: Keeping a well-documented record of all authorized devices helps demonstrate compliance during security audits.
3. Performance and Network Efficiency:
- Avoid Network Congestion: Unauthorized devices can consume bandwidth and resources, leading to performance issues.
- Optimize Resource Allocation: Understanding what devices are on the network allows for better allocation of resources and network capacity planning.
Example: A company network might inadvertently host devices like rogue wireless access points or forgotten IoT devices that an attacker could exploit to gain unauthorized access to internal resources.
Using Ridgeback to Audit IT Assets
Ridgeback provides a robust solution for auditing IT assets and identifying unauthorized devices on a network. With Ridgeback’s metadata analysis and real-time monitoring capabilities, network administrators can gain clear visibility into all connected devices and take action to secure their network.
How Ridgeback Helps:
-
Device Discovery:
- Ridgeback scans network traffic metadata to identify all devices attempting to communicate within the network, including those that may not be recognized by traditional asset management systems.
- It can detect devices based on their network behavior, IP addresses, MAC addresses, and communication patterns.
-
Automated Alerts:
- Ridgeback can be configured to send automated alerts when an unauthorized or unknown device connects to the network. This helps ensure that administrators are aware of potential security risks in real-time.
- Alerts can include detailed information such as the device’s IP address, MAC address, and the nature of its network activity.
-
Comprehensive Reporting:
- Ridgeback’s reporting features provide detailed summaries of all detected devices, highlighting which ones are authorized and which are not.
- Reports can be used to support compliance efforts by documenting the network’s asset inventory and highlighting steps taken to address unauthorized devices.
-
Behavior Analysis:
- Ridgeback doesn’t just identify devices; it also monitors their activity to detect anomalies that may indicate a security threat. For example, if an unauthorized device is trying to scan the network or access restricted areas, Ridgeback can flag this behavior for further investigation.
Steps to Audit IT Assets with Ridgeback:
- Initiate a Network Scan: Use Ridgeback to initiate a comprehensive scan of the network to identify connected devices.
- Review Alerts and Reports: Check automated alerts and detailed reports to spot any unauthorized or unknown devices.
- Verify Devices: Cross-reference detected devices with your authorized device list to confirm which are approved.
- Take Action:
- Remove Unauthorized Devices: Isolate and remove any devices that are not authorized to be on the network.
- Investigate Anomalies: Investigate any devices flagged for suspicious behavior to determine if they represent a legitimate threat.
- Update Asset Inventory: Ensure that your asset management database is updated with any new authorized devices and changes to existing ones.
Best Practices for Managing Unauthorized Devices
- Implement Network Access Control (NAC): Use NAC solutions alongside Ridgeback to enforce policies that prevent unauthorized devices from connecting to the network.
- Regularly Update Asset Inventories: Keep an up-to-date inventory of all authorized devices to make it easier to spot unauthorized ones.
- Segment the Network: Use segmentation to limit the impact of unauthorized devices that do manage to connect, containing them to isolated parts of the network.
- Continuous Monitoring: Deploy continuous monitoring practices using Ridgeback to maintain vigilance and quickly identify new or unauthorized devices as they appear.
Conclusion
Proper asset management is essential for maintaining a secure, compliant, and efficient network. With Ridgeback’s powerful device discovery and monitoring capabilities, organizations can gain better visibility into their network, identify unauthorized devices, and take swift action to mitigate risks. Implementing strong policies and using Ridgeback to support ongoing audits will help ensure that your network remains secure and well-regulated.
Using Reports and Analytics
Overview of Basic Reports
Basic reports provide a snapshot of key network activities and security events. These foundational reports help teams monitor ongoing network health and identify areas requiring attention.
- Threat Summary – An outline of identified threats within the network.
- Hostname Leakage Summary – A report on potential hostname exposures.
- Attack Surface and Matrix Summaries – Insights into network vulnerabilities and exposure.
- Endpoint Inventory – A detailed list of all network-connected devices.
- Risk Report – An assessment of the network’s overall risk profile.
Exporting Data to Spreadsheets
For deeper analysis and collaboration, data from reports can be exported as spreadsheets. Exporting data helps teams share findings effectively and conduct extended analyses that go beyond the standard reporting framework. Spreadsheet exports are ideal for:
- Custom Analyses – Conduct in-depth reviews or apply specialized metrics.
- Trend Tracking – Observe patterns over time and track improvements or risks.
- Integration – Use report data in other security management or analytics tools.
Threat Summary
The threat summary provides information on which endpoints have tried to communicate with unused addresses, or the dark space. The summary includes the hostname and IP address of each threat, the unused address the threat tried to contact, and the first and last time the threat was heard from.
Reporting on Hostname Leakage
Hostname leakage reports detect instances where internal hostname information may be visible to a malicious actor. This information can potentially expose sensitive network details, making it critical to identify and address any leaks. These reports enable administrators to quickly locate and remediate hostname exposure to minimize the risk of targeted attacks.
Reporting on the Attack Surface
The attack surface report identifies areas where the endpoints may be vulnerable, outlining:
- Vulnerable Endpoints – Devices that could be targeted by attackers.
- Exposed Services – Services accessible that could be exploited.
As a rule, you should turn off, disable, or block communications to any services that you do not need. The only services that should be exposed are services you understand and control yourself.
Endpoint Inventory
The endpoint inventory report provides a detailed list of all devices connected to the network. For each endpoint you can see what segment it is attached to (identified by Rcore), the hostname, the IP address, the MAC address, the OUI, and when the device was first and last heard from.
This inventory is crucial for asset tracking, verifying compliance, and identifying any unauthorized or high-risk devices. The endpoint inventory can be part of your IT property management procedures.
Ridgeback Risk Report
The Ridgeback Risk Report delivers a view of the network’s security posture. The report shows exposure, complexity, capacity, endpoint exposure distribution, endpoint complexity distribution, endpoint load, service load, and link load.
Exposure refers to the level of vulnerability to adverse events, such as hacking, equipment failures, and misconfigurations. Identifying and addressing hygiene concerns and misconfigurations can reduce the opportunities adversaries have to evade detection.
Complexity reflects the balance between efficiency and fragility. Increased complexity can raise the cost of maintenance and upgrades. By managing complexity, you can simplify the implementation of security measures, better isolate sensitive data, and more effectively contain potential breaches.
Capacity represents the overall scale of a network. It's crucial to monitor all endpoints and services in use to carefully manage and limit the connections and processes that could be susceptible to exploitation.
For the risk report to work, you need to enable both phantoms and the surface service.
Phantoms
Phantoms play a unique role in Ridgeback’s approach to network security, offering innovative ways to monitor, detect, and mitigate threats within the "dark space" of a network. This chapter explores what phantoms are, how they impact both devices and users, and why they are integral to proactive threat detection.
The Dark Space in Your Network
In every network, there exists a "dark space"—areas of unused IP addresses and ports. This dark space is not part of active network operations but can be revealing when interacted with. Any traffic directed toward this space is often unauthorized or unusual, serving as an early indicator of suspicious behavior. Phantoms occupy this dark space and are set up to appear as legitimate devices. By occupying and monitoring this otherwise-unused network territory, phantoms provide insights into potential threats that traditional security tools may miss.
What Are Phantoms and Why Are They Important?
Phantoms are virtual endpoints that appear to be real, network-connected devices but are designed solely to detect unauthorized activity. Phantoms do not perform any genuine network function; instead, they turn the dark space into a vast tarpit. When an entity—be it a device, user, or potential attacker—attempts to communicate with a phantom, it triggers alerts, indicating potential reconnaissance or probing activity. This activity may include scanning for open ports, searching for vulnerable devices, or attempting to map the network.
Phantoms are essential because they reveal threats in real-time without requiring an actual breach. By catching suspicious entities in the dark space, phantoms enable administrators to detect threats that may not yet have reached critical systems or sensitive data.
Recon Threats and Active Threats
Phantoms help detect two main types of threats:
-
Reconnaissance (Recon) Threats: These are attempts to gather information about the network’s layout, devices, and vulnerabilities. When attackers conduct network scans or port probes, phantoms register this activity as a recon threat, allowing administrators to monitor and respond before the attacker gains a foothold.
-
Active Threats: These occur when an endpoint initiates unauthorized activity, such as trying to exchange data with phantoms in the dark space. Active threats indicate potentially compromised devices attempting to communicate or exfiltrate data. By identifying these attempts early, phantoms enable swift responses to mitigate or contain the threat.
Why do we call these "threats?" We call them threats because they represent very clear and obvious paths through which an attacker can seize control of your network. Each threat is like an open door leading to the compromise of your network. Ignore the recon and active threats at your own risk.
As a bonus, cleaning up the recon and active threats makes for a much more hygenic and easy-to-manage network. Imagine having a network that hums along in an orderly fashion, making IT problems easier to troubleshoot and quicker to fix.
Running Without Phantoms
Operating a network without phantoms can leave critical blind spots. Without phantoms, administrators might miss out on early signs of attack, such as probing or scanning activity that would otherwise go undetected. In essence, phantoms act as a first line of defense, catching unauthorized behavior in low-traffic areas before it reaches critical infrastructure. Without this layer of detection, organizations may only become aware of threats after they have infiltrated deeper into the network, potentially leading to costly and disruptive incidents.
The Effects of Phantoms on Computers
Phantoms are passive from a device performance perspective. Since they exist in unused network spaces, they do not interfere with legitimate device communications or operations. Instead, they serve as sticky traps and leverage the network’s monitoring capabilities to detect and log interactions. For network devices, this means that phantoms offer a non-intrusive layer of security that strengthens overall network defense without impacting normal device performance.
The Effects of Phantoms on People
For network administrators and security teams, phantoms offer enhanced visibility into otherwise-hidden network activities, providing valuable insights into potential risks. Phantoms also reduce the cognitive load for security personnel by offering clear indicators of suspicious activity that can guide and prioritize response efforts.
For malicious actors like hackers and malware, phantoms gum up operations, seriously degrading an attacker's ability to execute the hacking techniques of reconnaissance and exploitation. From the attacker's perspective, engaging with phantoms feels like entering an unreliable network. In fact, many professional penetration testers (i.e., the red team) have reported that engaging Ridgeback makes it seem like their own network is having problems. The end result is that malicious actors become very noisy and easy to detect after they contact one or more Ridgeback phantoms.
For end users, the impact of phantoms is invisible but valuable. By detecting threats before they escalate, phantoms contribute to a secure network environment, ultimately reducing the likelihood of disruptive security incidents or breaches.
Summary
Phantoms are a crucial tool in Ridgeback’s security framework, utilizing the dark space in a network to detect recon and active threats before they become critical issues. By running a network with phantoms, organizations gain early insights into suspicious activity, minimizing risks while enhancing overall security posture. Phantoms provide a proactive, non-intrusive method for keeping networks safe, offering both administrators and users peace of mind that potential threats are being caught at the earliest possible stage.
Using Ridgeback to Enhance Visibility and Harden Communications Infrastructure
Modern communications infrastructure faces ongoing, sophisticated threats from adversaries who exploit weak network visibility and insecure configurations to infiltrate systems and exfiltrate critical data. Guidance (released December 2024) from the Cybersecurity and Infrastructure Security Agency (CISA) reinforces the need for robust visibility, strict configuration management, and proactive hardening of network devices. In particular, it urges organizations to:
- Strengthen visibility into network traffic and configuration changes,
- Monitor accounts and device logins for anomalies,
- Ensure patching and secure configurations,
- Limit management exposure,
- Segment networks effectively,
- Deploy strong authentication and encryption standards.
Ridgeback—a platform designed to provide real-time network visibility, detect anomalies, and enforce security policies—aligns closely with these recommended measures. By deploying Ridgeback strategically across communications infrastructure, organizations can gain the insights and controls necessary to implement CISA’s guidance effectively.
1. Strengthening Visibility into Network Activity and Configurations
CISA Guidance: The guidance emphasizes comprehensive monitoring, including scrutinizing configuration changes, tracking flows at ingress and egress points, centralizing logs, and enforcing rigorous change management.
How Ridgeback Helps:
Ridgeback continuously collects and analyzes network traffic metadata, providing a clear, near real-time view of who is talking to whom on the network. By deploying Ridgeback components (service containers and Rcores) at key network segments, organizations can:
-
Monitor Configurations in Context: Use Ridgeback’s historical event data in conjunction with external configuration management and inventory tools to identify when configuration changes correlate with suspicious traffic patterns.
-
Centralized Visibility: Ridgeback’s server provides a unified dashboard displaying authorized and unauthorized communications, endpoint inventories, and suspicious events. Organizations can correlate these insights with their change management systems and SIEM tools for holistic visibility.
-
Enforceable Policies: Ridgeback’s policy engine can trigger alerts or actions based on detected anomalies. For example, if Ridgeback detects management traffic from unexpected sources, administrators can receive alerts or Ridgeback can automatically log these events for further investigation.
2. Monitoring User and Service Accounts for Anomalies
CISA Guidance: Validate and prune inactive accounts, monitor user logins internally and externally, and establish strong authentication mechanisms.
How Ridgeback Helps:
While Ridgeback does not replace identity and access management systems, it adds a critical layer of visibility:
-
Correlating Network Events with Account Activities: Ridgeback’s metadata analysis reveals which endpoints communicate internally and externally. By integrating these insights with logs from authentication services or AAA servers, organizations can detect mismatches (e.g., an account that should only manage devices from a dedicated workstation is observed initiating other management traffic).
-
Detecting Suspicious Patterns: If an account normally accesses certain network segments, Ridgeback can highlight anomalies where that same account’s device attempts lateral movement or contacts previously unused addresses, helping organizations quickly flag potentially compromised accounts.
3. Limiting Management Exposure and Secure Configuration
CISA Guidance: Do not allow device management from the internet, use an out-of-band management network, and ensure no default passwords or insecure protocols remain. Implement network segmentation and deny unnecessary traffic.
How Ridgeback Helps:
Ridgeback can enforce network segmentation policies by detecting unauthorized communications:
-
Preventing Out-of-Policy Traffic: Ridgeback can identify any traffic crossing segment boundaries that should not be connected. If a device management session originates from outside the designated out-of-band management network, Ridgeback can flag or disrupt it.
-
Zero-Tolerance Alerts for Insecure Protocols: Ridgeback’s event data can help spot when legacy or insecure management protocols (e.g., Telnet, SNMPv1) appear. The platform’s policy engine can trigger alerts or initiate automated responses such as quarantining the offending endpoint until it is reconfigured securely.
-
Dynamic Enforcement: If Ridgeback’s policies detect an endpoint trying to use default or known weak credentials (identified by suspicious repeated attempts to contact phantom endpoints or misconfigured devices), administrators can be alerted to reset or remove those credentials.
4. Comprehensive Logging and Correlating with SIEM
CISA Guidance: Implement secure, centralized logging, analyze and correlate logs from multiple sources, and apply SIEM solutions for quicker incident identification.
How Ridgeback Helps:
Ridgeback’s database and surface mapping of events complement log-based approaches:
-
Event Fusion: While CISA suggests centralized logging, Ridgeback provides structured network event metadata. Export Ridgeback’s event data into your SIEM for correlation with firewall logs, IDS/IPS alerts, and system logs. This combined approach enables advanced analytics, making anomalies more evident.
-
Pinpointing Attack Paths: If a SIEM alert indicates suspicious activity, Ridgeback’s historical network event data can help trace the lateral movement path, identify which segments were probed, and reveal previously unseen reconnaissance attempts.
5. Baselines and Detecting Abnormal Behavior
CISA Guidance: Establish baseline behavior and alert on anomalies.
How Ridgeback Helps:
Ridgeback inherently supports building baselines by continuously collecting traffic metadata over time:
-
Normal vs. Anomalous Patterns: Ridgeback’s risk and analytics features can help define what ‘normal’ traffic looks like for each endpoint or segment. Deviations—such as a device suddenly reaching out to previously unused IP ranges—can immediately raise alerts.
-
Incident Response and Forensics: If an incident is detected, Ridgeback allows administrators to pivot through historical data to understand when abnormal behavior began, which devices were involved, and how threats spread.
6. Enforcing Strong Cryptography and Protocol Selection
CISA Guidance: Use modern encryption, authenticated protocols, and secure cryptographic algorithms. Disable weak protocols and services.
How Ridgeback Helps:
While protocol changes and cryptography configurations occur at the device and network service level, Ridgeback provides critical feedback loops:
-
Detect Non-Compliance Quickly: If insecure services reappear due to misconfiguration, Ridgeback instantly detects unauthorized attempts to communicate or contact unused IPs/phantoms. This prompts swift remediation before adversaries exploit them.
-
End-to-End Monitoring: After network hardening, Ridgeback verifies that only the intended services continue communicating. If a deprecated service is accidentally re-enabled, Ridgeback’s continuous visibility ensures it cannot remain undetected.
7. Using Ridgeback to Enforce Microsegmentation and Zero Trust
CISA Guidance: Segment networks rigorously, employ defense-in-depth, and restrict lateral movement opportunities.
How Ridgeback Helps:
Ridgeback can help realize microsegmentation and zero trust principles:
-
Detailed Inventory and Surface Mapping: Ridgeback’s endpoint inventory and surface maps show exactly which endpoints communicate, enabling fine-grained segmentation policies.
-
Automated Enforcement: If policies require that certain segments never communicate, any attempt to cross these boundaries triggers a Ridgeback alert or response. Over time, policies can be refined to enforce least-privilege network access, aligning with zero trust strategies.
8. Continuous Improvement and Compliance
Ridgeback provides consistent feedback on network conditions, helping organizations align with not only CISA’s best practices but also ongoing compliance frameworks. As device configurations evolve and new patches or firmware updates are applied, Ridgeback’s continuous monitoring ensures that changes do not inadvertently create new blind spots or vulnerabilities.
Conclusion
Addressing the points in CISA’s “Enhanced Visibility and Hardening Guidance” requires a multi-faceted approach involving thorough monitoring, segmentation, secure configurations, and continuous validation of network hygiene. Ridgeback serves as a force multiplier for these efforts by providing real-time visibility into network traffic, facilitating anomaly detection, supporting segmentation, and integrating seamlessly with broader security infrastructures like SIEMs and centralized logging solutions.
By deploying Ridgeback in conjunction with rigorous security policies and hardened configurations, organizations can more effectively thwart malicious actors, maintain regulatory compliance, and operate a communications infrastructure resilient to the evolving cyber threat landscape.
Securing Ridgeback
Within your organization, understanding Ridgeback's architecture and security zones is critical. Ridgeback security encompasses the database, Ridgeback services, and Rcores.
Database
Ridgeback requires a MySQL-compatible database server (e.g., MariaDB, Azure Database for MySQL, Amazon RDS for MySQL, or MySQL). Ridgeback's databases are designed for strict data isolation, with sensitive audit information kept in separate databases. In multi-tenant setups, each organization’s data resides in separate databases, ensuring no data leakage across organizations.
Best Practices for Database Security:
- Enable TLS: Ensure encrypted communications between Ridgeback services and the database.
- IP Whitelisting: Limit database access to only necessary IP addresses.
- Database Hardening: Regularly update the database software, restrict privileges, and disable unnecessary features.
- Backups: Implement a robust backup strategy, especially for critical Ridgeback databases.
Ridgeback Containerized Services
Ridgeback services (e.g., Server, Policy, and Manager) are deployed within a containerized environment. Containers, as lightweight virtualized environments, allow Ridgeback to package only the essential components without needing a full operating system. These services run in a container host, such as Docker, Azure Container Instances, or Amazon Elastic Container Service. Securing the container host is essential because if the host is compromised, so are the containers.
Best Practices for Ridgeback Services Security:
- Host Hardening: Disable non-essential services on the container host to reduce the attack surface.
- Access Control: Restrict container host access to essential IT administrators only.
- IP Whitelisting: Control access to the container host with IP whitelisting.
- Patching: Regularly update the container host to address security vulnerabilities.
Rcores
The Ridgeback Manager service communicates securely with Rcores through encrypted channels. Rcores are lightweight agents installed on endpoints, monitoring and responding to security events.
Best Practices for Rcore Security:
- Endpoint Security: Deploy Rcores on endpoints that are regularly updated and monitored for security.
- Access Restrictions: Limit Rcore installations to trusted endpoints and maintain an inventory of Rcore deployments.
- Logging and Monitoring: Track Rcore activity to ensure compliance with Ridgeback policies.
Security Best Practices for Windows and Linux Systems
Ensuring Ridgeback’s effectiveness relies on a secure underlying infrastructure, particularly in your Windows and Linux environments.
Windows Best Practices
- Update Regularly: Keep Windows systems updated with the latest security patches.
- Use Windows Defender or Endpoint Protection: Ensure active endpoint security software to detect and prevent threats.
- Enable Firewall: Configure and enable the Windows Firewall to control incoming and outgoing traffic.
- Access Control: Enforce least privilege access and ensure administrators use separate accounts for administrative tasks.
- Audit Policies: Enable audit logging to track security events and review logs regularly.
Linux Best Practices
- Regular Patching: Keep Linux systems updated, especially with security patches.
- Enable SELinux or AppArmor: Use mandatory access controls to limit the impact of potential breaches.
- IPTables/FirewallD Configuration: Use a firewall to manage network traffic effectively.
- Disable Root Login: Use sudo for privileged operations and disable direct root access.
- System Auditing: Implement tools like
auditdto log and monitor system events.
Instance Metadata Service (169.254.169.254)
The IP address 169.254.169.254 is a special non-routable address used by cloud service providers (e.g., AWS, Azure, Google Cloud) for instance metadata services (IMDS). It provides instances with information about their configuration, credentials, and other data needed to operate in the cloud environment.
In a data center context, if this IP address is exposed improperly or queried by unauthorized services, it can pose a significant security risk. Specifically:
- Potential Vulnerability: If attackers can access this IP address from within your network, they might extract sensitive metadata such as instance details or temporary security credentials, which could lead to unauthorized access and privilege escalation.
- Remediation Steps:
- Restrict Access: Ensure that only authorized and essential services can access
169.254.169.254. - Firewall Rules: Implement network segmentation and firewall rules to limit access to this IP.
- Metadata Versioning: Use metadata services that require tokens or have enhanced security features (e.g., AWS IMDSv2) to mitigate risks.
- Audit and Monitor: Continuously audit logs and network traffic to detect and prevent unauthorized access attempts.
- Restrict Access: Ensure that only authorized and essential services can access
If this address is not relevant to your setup or shouldn’t be accessed from certain segments, it’s crucial to identify why it’s in use and limit its accessibility to trusted sources only.
Spoofing 169.254.169.254 to Attack a Local Network
In non-cloud or on-premises environments, attackers can exploit the IP address 169.254.169.254 by spoofing it to imitate an Instance Metadata Service (IMDS). This address, typically reserved in cloud environments to provide instances with configuration and credential information, can be misused on a local network to deceive local services or applications that may be hardcoded to request metadata from this IP. By simulating an IMDS, attackers could potentially extract sensitive information or even inject malicious configuration data.
How the Attack Works
- Spoofing IMDS: Attackers set up a device or service on the network that responds to requests to
169.254.169.254, simulating the behavior of an IMDS. - Exploiting Assumptions: Some applications or services, especially if configured for hybrid cloud environments, may inadvertently reach out to this address to retrieve metadata. If such applications lack proper validation, they might accept and execute malicious data returned by the spoofed IMDS.
- Credential Harvesting: If applications or devices are configured to use the spoofed metadata service for credentials or configurations, attackers can intercept sensitive data. This could enable privilege escalation or lateral movement within the network.
- Configuration Manipulation: Attackers could inject malicious configurations or metadata that alter service behavior, creating backdoors or disrupting normal operations.
Mitigation Measures
- Restrict Access: Prevent internal services from accessing
169.254.169.254if it is not required within your network. - Network Segmentation and Firewalls: Use firewall rules to block access to
169.254.169.254from unauthorized devices or networks, ensuring only trusted services can reach it. - Application Validation: Configure applications to validate any metadata they retrieve, ensuring data integrity and source authentication.
- Monitoring: Regularly monitor for network traffic directed at
169.254.169.254to identify potential spoofing attempts or misconfigurations.
The Multicast Broadcast
Do you see ICMP traffic going to 224.0.0.1? Maybe you should shut it down.
The address 224.0.0.1 represents all hosts on a local network that are listening to multicast traffic. Here are some nefarious uses of the address:
-
Network Mapping and Reconnaissance: Attackers can use ICMP to discover active hosts on a network. Sending ICMP requests to
224.0.0.1can reveal the presence of devices that respond, aiding in network reconnaissance and mapping. -
Denial of Service (DoS) Potential: A flood of ICMP packets to this address can lead to network congestion. Since all devices in the local subnet may process or respond to such traffic, this can overwhelm network resources, causing a potential denial of service.
-
Amplification Attacks: Malicious actors may exploit ICMP to amplify traffic, which can be part of a distributed denial of service (DDoS) strategy. This occurs when attackers spoof source IPs and send ICMP requests to
224.0.0.1, prompting multiple devices to respond to the spoofed address, overwhelming the victim. -
Unfiltered Traffic: If ICMP traffic is not properly managed or filtered by firewalls and network devices, attackers may exploit this to gather information or disrupt operations. Open ICMP responses increase the attack surface.
Rcore Configurations
The Rcore is a lightweight program. You "start" an Rcore by running an rcore executable. You "stop" an Rcore by stopping, terminating, or killing a running rcore executable.
The rcore executable can take many command line arguments. This makes the Rcore highly configurable and compatible with pretty much any network configuration.
Listed below are the possible arguments.
Options:
    --help                   | Display this help message.
    --version                | Display the version.

LICENSE INFORMATION
    --license-name=<name>    | Set the license name.
    --license-key=<key>      | Set the license key.

NETWORK INTERFACES
    --list-interfaces        | List all of the available interfaces.
    --downlink=<interface>   | Set the downlink interface by name or address.
    --uplink=<interface>     | Set the uplink interface by name or address.
    --describe-interfaces    | Describe the uplink and downlink interfaces set and exit.

BRIDGING INTERFACES (experimental)
    --bridge-down            | Bridge traffic from uplink to downlink.
    --bridge-up              | Bridge traffic from downlink to uplink.

FILTERING
    --include-global-traffic | Process IPv4 traffic to or from global IPv4 addresses. (Default is to exclude global traffic.)

MANAGER SETTINGS
    --core-id=<core-id>            | Set the core ID.
    --enc-key=<key>                | Set the encryption key. (defaults to plaintext)
    --manager-port=<port>          | Set the rcore manager port. (use stdio if missing)
    --manager-server=<host>        | Connect to an rcore manager. (defaults to stdio)
    --org-id=<org-id>              | Set the org ID.
    --use-v4-messages              | Use version 4 messages.
    --max-connection-attempts=<n>  | Retry manager connection <n> times before failure.

LIVE / DARK TRACKING
    --always-live-ipv4-list=<list> | Always assume IPv4 addresses in <list> are live.
    --echo-arp-request             | Echo ARP request packets. (signal injection)
    --echo-latency-dhcp=<t>        | Minimum time (ms) between DHCP message and ARP echo. (default=60000)
    --echo-latency-ipv4=<t>        | Minimum time (ms) between live IPv4 and ARP echo. (default=60000)

PHANTOMS
    --no-phantoms-for-ipv4-list=<list> | Do not present phantoms to endpoints in the list of IPv4 addresses.
    --no-phantoms-for-mac-list=<list>  | Do not present phantoms to endpoints in the list of MAC addresses.
    --phantom-arp-threshold=<n>        | Send a phantom ARP reply after <n> ARP requests go unanswered. (default=2)
    --phantom-start-delay=<t>          | Start phantoms after <t> milliseconds. (default=180000ms)
    --phantom-time-threshold=<t>       | Send a phantom ARP reply after <t> milliseconds of live endpoint inactivity. (default=300000)
    --phantom-arp                      | Enable phantom ARP replies.
    --phantom-icmp                     | Enable phantom ICMP replies.
    --phantom-tcp                      | Enable phantom TCP replies.
    --synth-mac-list=<list>            | List of comma-separated synthetic MAC addresses. (default is the uplink interface MAC)

TRACKING (single)
    --track-dhcp               | Track DHCP requests.
    --track-ipv4-global        | Track IPv4 global addresses.
    --track-ipv4-local         | Track IPv4 link local addresses.
    --track-ipv4-private       | Track IPv4 private addresses.
    --track-ipv6               | Track IPv6 addresses.

TRACKING (pair)
    --track-ipv4-pairs         | Track IPv4 source/destination pairs.
    --track-ipv6-pairs         | Track IPv6 source/destination pairs.
    --track-mac-pairs          | Track MAC source/destination pairs.

MONITORING (structured)
    --heartbeat=<n>            | Emit a heartbeat message every <n> seconds. (default=30)
    --show-arp                 | Show the ARP traffic.
    --show-dhcp                | Show the DHCP traffic.
    --show-icmp                | Show the ICMP traffic.
    --show-tcp                 | Show TCP connection attempts.

MONITORING (IPv4 multicast)
    --show-all-multicast-ipv4  | Show all the IPv4 multicast traffic. (verbose with payloads)
    --show-llmnr-ipv4          | Show the LLMNR multicast traffic.
    --show-mdns-ipv4           | Show the mDNS multicast traffic.
    --show-ntp-ipv4            | Show the NTP multicast traffic.
    --show-ssdp-ipv4           | Show the SSDP multicast traffic.
    --show-ssdp2-ipv4          | Show the SSDP v2 multicast traffic.
    --show-teredo-ipv4         | Show the Teredo multicast traffic.

MONITORING (raw)
    --show-arp-reply           | Show the ARP reply packets.
    --show-arp-request         | Show the ARP request packets.
    --show-ethernet-header     | Show the Ethernet headers seen.
    --show-ethernet-frame      | Show the bytes of the Ethernet frames seen.
    --show-frame-length        | Show the Ethernet frame length.
    --show-ipv4-header         | show the IPv4 headers seen
    --show-ipv6-header         | show the IPv6 headers seen
    --show-tcp-header          | show the TCP headers seen
    --show-udp-header          | show the UDP headers seen
    --show-tcp-fin             | show TCP headers with FIN
    --show-tcp-rst             | show TCP headers with RST
    --show-tcp-syn-ack         | show TCP headers with +SYN +ACK
    --show-tcp-syn-noack       | show TCP headers with +SYN -ACK

REPORTING
    --report-freq=<n>          | Display the live reports every n frames. (default=1000)
    --report-arp-pressure      | Report stats on ARP pressure.
    --report-live-dhcp         | Report stats on DHCP traffic.
    --report-live-ipv4-global  | Report stats on global IPv4 addresses.
    --report-live-ipv4-local   | Report stats on local IPv4 addresses.
    --report-live-ipv4-private | Report stats on private IPv4 addresses.
    --report-live-ipv6         | Report stats on IPv6 addresses.
    --report-ipv4-pairs        | Report stats on IPv4 pairs.
    --report-ipv6-pairs        | Report stats on IPv6 pairs.
    --report-mac-pairs         | Report stats on MAC pairs.
Active and Passive Rcore
We often speak of the Rcore being in active or passive mode. These are generalizations of categories of configurations.
- Active: An Rcore configured to be active will inject custom Eternet frames.
- Passive: An Rcore configured to be passive will not allow phantom activation. That is, it will not inject forged Ethernet frames.
- Silent: An Rcore configured to be silent will not inject any Ethernet frames. If the Rcore is running in silent mode, then you probably do not want the Surface service running.
If you do not have accurate documentation or knowledge of your network, then you may want to start with a silent mode to get a feel for how your network is operating now. Once you have a better understanding of the network you can move on to passive mode, and then ultimately active mode.
Active Settings
The Rcore options that make it active are:
--echo-arp-request--phantom-arp--phantom-icmp--pahntom-tcp
Passive Settings
The Rcore options that make it passive are:
--echo-arp-request
Silent Settings
To make the Rcore silent, do not include any of the settings used for active or passive modes.
Passive Rcore, UI Phantoms
Running the Rcore in a configuration that does not display phantoms can be useful in various scenarios. For instance, you might want a quick, non-intrusive view of a network or need to locate and document the placement of DHCP servers or vulnerability scanners. This "no-phantoms" configuration is referred to as passive mode.
Why Do Phantoms Appear in Passive Mode?
Occasionally, you may observe phantoms in the UI even when the Rcore is set to passive mode. What’s happening?
If the Rcore is in passive mode, but phantoms (associated with TCP connections) appear in the UI, it indicates that TCP data—actual content—is leaking into the machine running the Rcore. This can occur due to:
- The machine being connected to a hub instead of a switch.
- Guest VMs running on the same computer as the Rcore. This issue is particularly common when the Rcore operates on the host system of a hypervisor instead of a guest operating system.
Recommended Actions
Data leakage into the Rcore machine should be treated as a potential security event. Investigate and resolve the cause of the leak to secure the network.
If you want to run the Rcore in passive mode, but do not want to see any phantom icons in the UI (who cares about data leakage, right?), then do not include this argument in the Rcore configuration:
--show-tcp
If you remove the argument above, then the Rcore will not report on TCP events to the UI.
Rcore and DHCP
The Rcore can allow new devices to join the network and request DHCP addresses. The Rcore will step back and avoid the new device. Use the --track-dhcp argument to allow DHCP. However, many DHCP servers will scan parts of the network to determine what IP addresses are available for assignment. In general, we don't want anything scanning the network without us documenting that fact.
If you have a DHCP server that scans the network to check for unused IP addresses, you will need to add that DHCP server to your Rcore configuration, like this:
--no-phantoms-for-ipv4-list=<dhcp-server-address>
The --no-phantoms-for-ipv4-list argument sets a list of computers that will be immune to phantoms. Anything in the list will never see phantoms generated by the Rcore.
Security and IT Policies
Basics
Part of security is knowing what assets exist and how they are being used. Another part of security is establishing policies for how assets can be used, and then enforcing those policies. Policies are defined using the ridgeback-server service (from the web client) and policies are enforced by the ridgeback-policy-engine service.
There are four parts to a policy:
- Time window - the times a policy is active
- Trigger - the conditions that define a policy violation
- Action - the procedure to be taken if the policy is violated
- Countermeasure - the action to be taken to correct the policy violation
An action is generic, like sending an email alert, updating a
database entry, or calling a method on a remote service. Executing
an action does not necessarily correct the policy violation.
A countermeasure is an attempt to correct the policy violation. It
could be removing an offending person or process from the network,
removing a person or processes access privileges, or reconfiguring
assets in a way that prevents further violation.
Parts of a Policy
Time Window : When the policy is active.
As of version 3.2.0, the time window is defined by a naive scheduling algorithm equivalent to a Unix cron job. Unfortunately, this naive introduces many intractable problems in an enterprise environment.
A set of start/end times to define the time window. The time is be a 24-hour clock time plus a time zone offset. The window will also include days of week and days of month to allow further constraint.
Trigger : An SQL query that "triggers" a policy action.
A trigger is a query statement that returns a list of policy violations. The trigger query statement may set variables that are used by either actions or countermeasures. Thus far, Ridgeback has always used SQL to define trigger query statements.
Action : Something a policy does after a trigger event.
An action is a form of alert that can be used to notify a person or process, record an event, or initiate action by another process.
Countermeasure : Something a policy does to correct a policy violation.
A countermeasure is a procedure used to correct a policy violation. For example, if a computer is violating policy by scanning a network, then a valid countermeasure would be to isolate that computer from the network.
The host isolation countermeasure included with Ridgeback will use
the variables isolate_ipv4 and isolate_mac. The variables should
be set by the trigger query statement.
Here is an example trigger statement that sets the variables
isolate_ipv and isolate_mac:
SELECT DISTINCT
  CoreId,
  src_ip AS isolate_ipv4,
  "11:22:33:44:55:66" AS isolate_mac
FROM NetEvent
WHERE
  remark LIKE '{"type":"Core:Network:IsolateIpv4","date":%'
  and reviewed IS NULL;
Chained Policies
Sometimes real-world requirements are more complex than what can be implemented in a single trigger. To handle more complex security requirements, consider using chained policies. Chained policies are multiple policies that depend on each other.
Example:
- Endpoint 10.10.10.101 should not communicate with endpoint 10.10.10.102.
- If an endpoint engages in unauthorized communication, isolate it.
- If an administrator approves unauthorized communication, allow the communication.
The requirements above can be implemented using two policies. The first policy flags unauthorized communication:
UPDATE NetEvent
  SET remark = 'Core:Net:Isolate,Unauthorized Communication'
  WHERE
    (src_ip = '010.010.010.101' AND dst_ip = '010.010.010.102') AND
    (remark IS NULL) AND
    (reviewed IS NULL);
The second policy isolates endpoints that have been flagged:
SELECT
  NetEvent.src_ip AS isolate_ipv4,
  '11:22:33:44:55:66' AS isolate_mac
  WHERE
    (remark LIKE 'Core:Net:Isolate% ') AND
    (reviewed IS NULL);
Combined, the two policies flag unauthorized communications, isolate endpoints that have been flagged, and allow an administrator to override the flag using the Incident Explorer user interface.
Add a Trigger and Create a Policy in the UI
Step 1: Add a Trigger
-
Open the Trigger Management Interface:
- Click the hamburger menu in the upper-right corner.
- Select Admin > Policy Trigger Management.
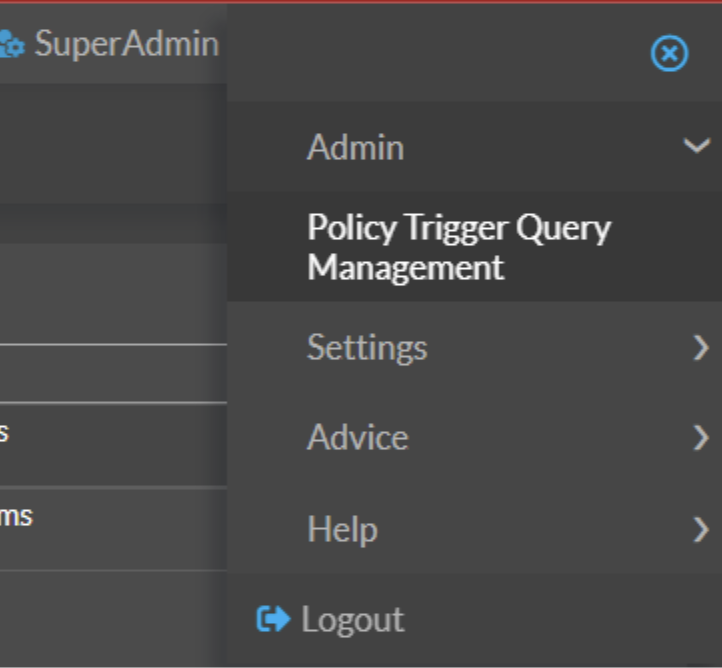
-
Create a New Trigger:
- Click New Trigger Query in the top-left corner.
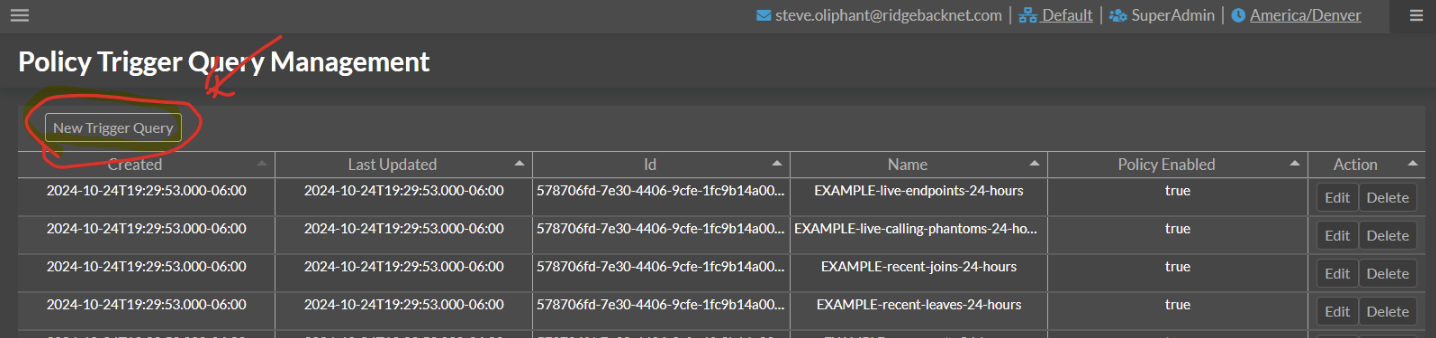
-
Configure the Trigger:
- Name the trigger (this will appear in the list when creating policies).
- Toggle Enabled to make it available in the policy trigger list.
- Paste the SQL query from the documentation.
- Add a description and click Save.
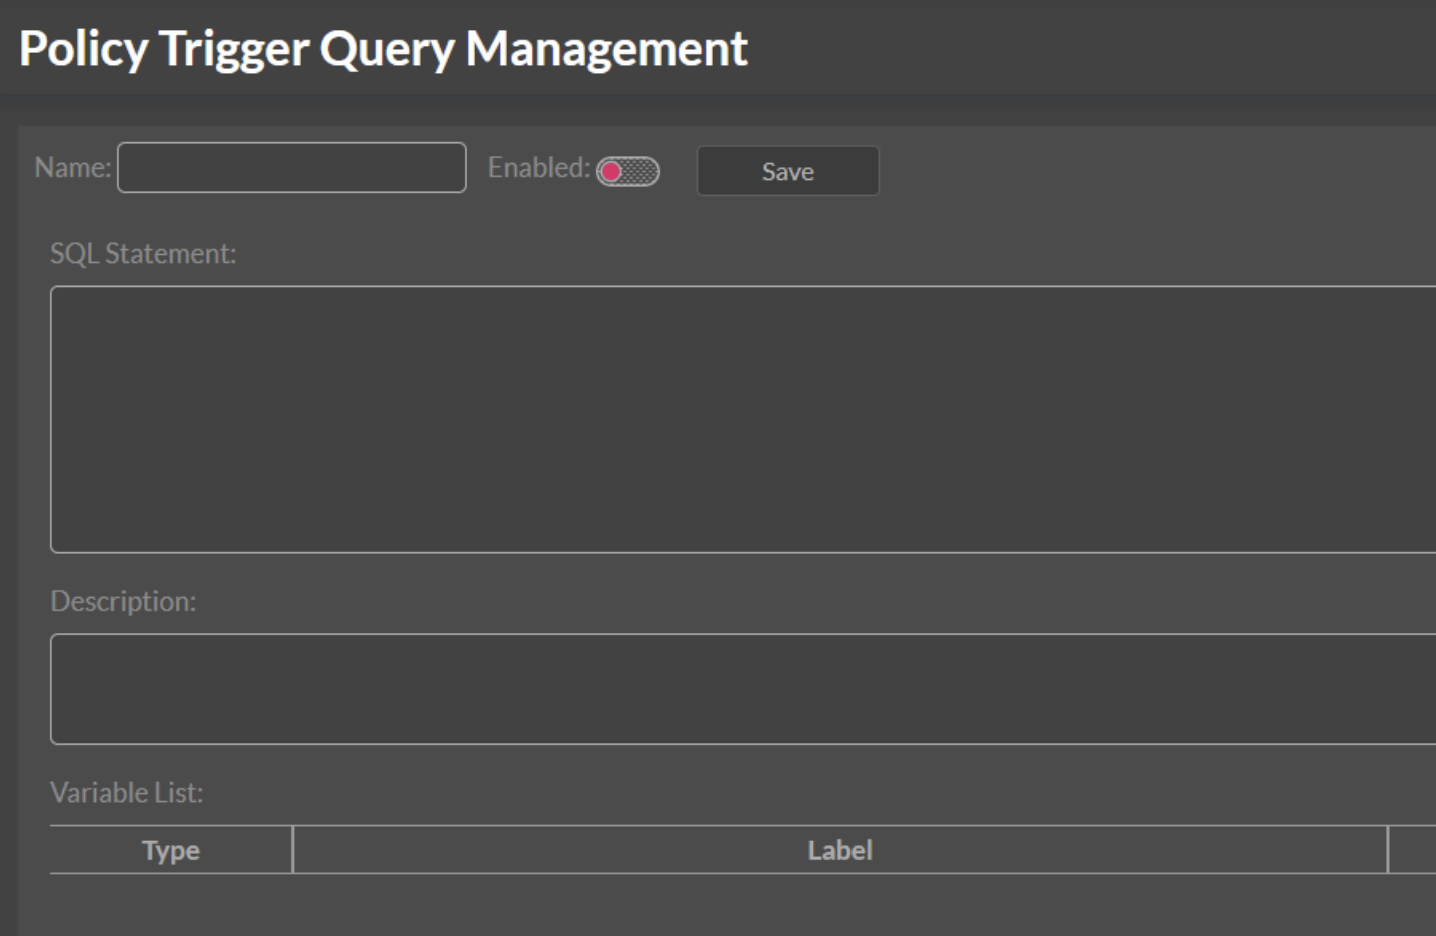
Example configuration:
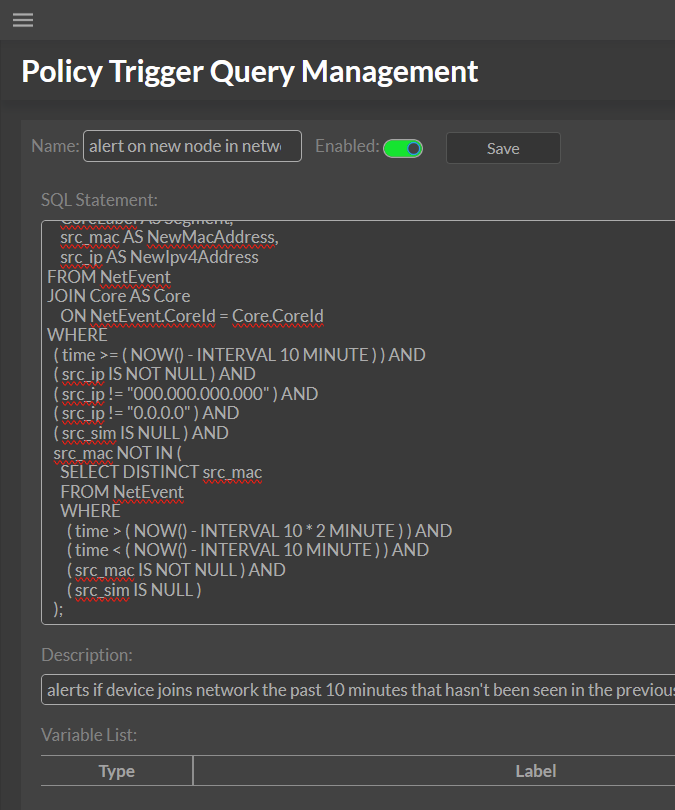
-
Repeat for Additional Triggers:
- Set up triggers like "Phantom Contact" and "Device Joining the Network" from the documentation.
Step 2: Create a Policy
-
Access Policy Creation:
- Click Policy in the left-hand menu.
- Select New Policy.
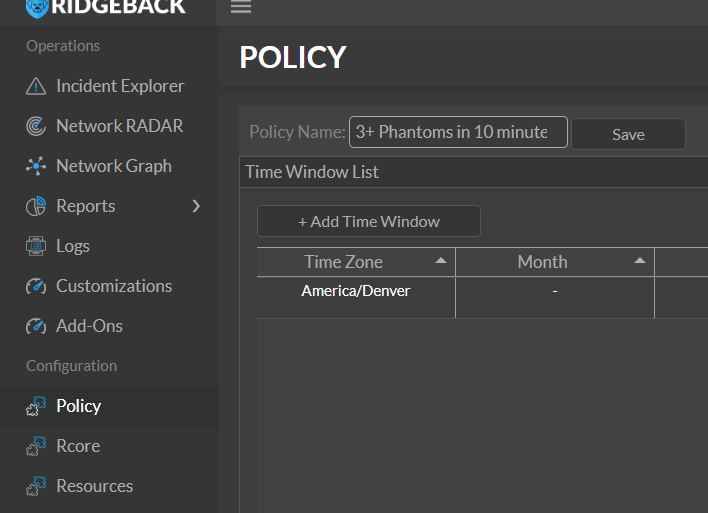
-
Name the Policy and Configure Time Settings:
- Enter a name for the policy.
- Add a Time Window:
Default settings:- Start: Hour Midnight, Minute 0
- End: Hour 11 PM, Minute 59
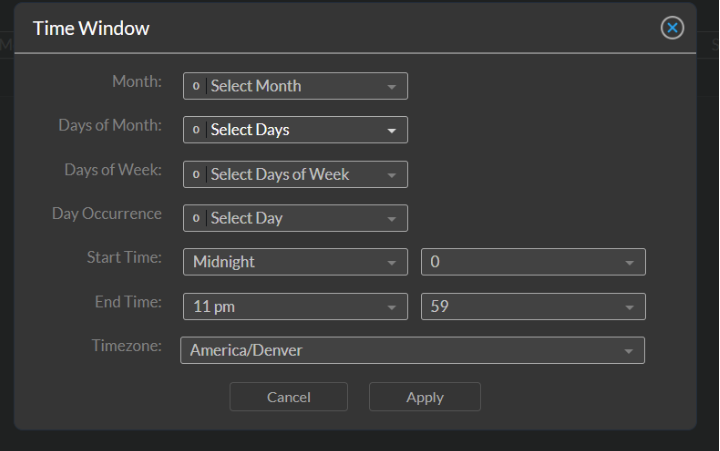
- Leave everything else unselected for the policy to run continuously.
- Click Apply.
-
Select a Trigger:
- Go to Trigger Selection.
- Choose the trigger you set up.
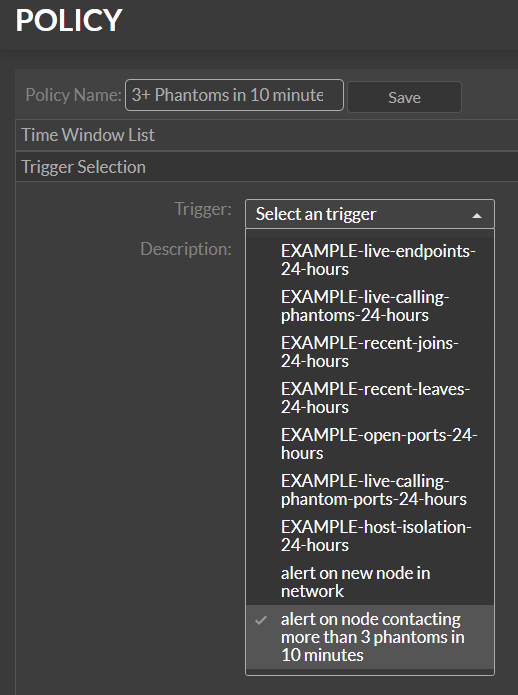
-
Set Alerts and Actions:
- Navigate to Alert and Action Settings.
- Set the action to Log to Console (Policy Container Log).
- Enable Email Alert:
- Set "Email Frequency" to Once.
- Enter the recipient email in Email To.
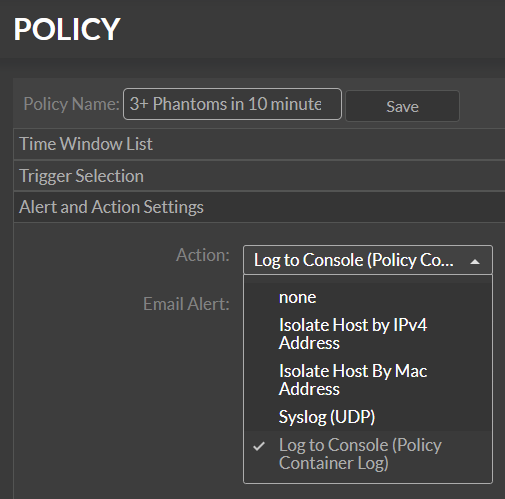
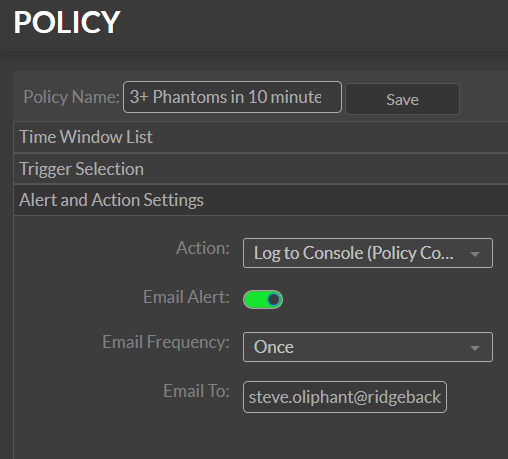
-
Save the Policy:
- Click Save.
- If there are missing fields, the system will guide you to complete them.
-
Repeat for Additional Policies:
- Follow these steps for each trigger you’ve set up.
Troubleshooting
- If emails do not arrive:
- Check the Policy container log for errors.
- Use Docker Desktop GUI or run the command:
docker compose logs policy - Review the log for email errors or policy output.
Introduction to Scripting for Ridgeback Policies
Scripting is a powerful and flexible way to implement custom policies in Ridgeback. While the built-in UI allows you to create and manage basic policies, scripting enables more advanced and precise control over triggers and actions by leveraging the underlying database and automation capabilities.
Why Use Scripts for Policies?
- Flexibility: Scripts allow you to define complex logic and conditions that may not be possible using the UI alone.
- Automation: They integrate seamlessly into automated workflows for monitoring and responding to network events.
- Customization: You can tailor policies to your organization's specific security and compliance requirements.
- Scalability: Scripts can be reused and adapted across different organizations or networks, making them a scalable solution for large deployments.
How Scripting Works with Ridgeback Policies
Ridgeback policies rely on triggers, which are essentially SQL queries that identify specific events or conditions in the network. Scripts provide a mechanism to:
- Generate and execute these SQL queries dynamically.
- Interact with Ridgeback's database to extract relevant data.
- Apply logic to determine policy actions based on query results.
Scripts are typically written in shell scripting languages like Bash, but other languages (e.g., Python) can also be used, provided they interact correctly with Ridgeback's database.
Best Practices for Scripting Policies
- Start Simple: Begin with straightforward queries and gradually introduce complexity.
- Modularize Scripts: Reuse common functions or templates to simplify script maintenance.
- Test Thoroughly: Run scripts in a controlled environment before deploying them to production.
- Secure Your Scripts: Use environment variables (e.g.,
.envfiles) to manage sensitive information like database credentials.
Here is an example of a shell script (for Linux or Mac) that will list the MAC addresses of devices that joined the network within the last 24 hours:
#!/bin/bash
# Copyright (C)2022-2023 Ridgeback Network Defense, Inc.
#
# This query makes a good trigger statement.
# List the new MAC addresses
# over the last 24 hours.
#
source .env

ORGID=$1
ORG=Data_`echo ${ORGID} | tr '-' '_'`

if [ "$ORGID" == "" ] ; then
    echo "List the new MAC addresses"
    echo "over the last 24 hours."
    echo "  Usage: trigger-list-new-mac-24.sh <orgid>"
    exit 0
fi

sql="
    SELECT DISTINCT src_mac AS NewMacAddress
    FROM ${ORG}.NetEvent
    WHERE (
        ( time > ( now() - interval 24 hour ) ) AND
        ( src_sim IS NULL ) AND
        src_mac NOT IN (
            SELECT DISTINCT src_mac
            FROM ${ORG}.NetEvent
            WHERE (
                ( time > ( now() - interval 48 hour ) ) AND
                ( time < ( now() - interval 24 hour ) ) AND
                ( src_mac IS NOT NULL ) AND
                ( src_sim IS NULL )
            )
        )
    );
"

echo ${sql} | \
    mysql \
        --ssl \
        -h${DatabaseHostname} \
        -u${DatabaseUser} \
        -p${DatabasePassword}
Here is one that lists the MAC addresses that map to more than a single IP address:
#!/bin/bash
# Copyright (C)2022-2023 Ridgeback Network Defense, Inc.
#
# This query makes a good trigger statement.
# List the MAC addresses mapped to more than one IPv4 address
# over the last 24 hours.
#
source .env

ORGID=$1
ORG=Data_`echo ${ORGID} | tr '-' '_'`

if [ "$ORGID" == "" ] ; then
    echo "List the MAC addresses mapped to more than one IPv4 address"
    echo "over the last 24 hours."
    echo "  Usage: trigger-list-single-mac-many-ip4-24.sh <orgid>"
    exit 0
fi

sql="
    SELECT MacAddress, n
    FROM (
        SELECT src_mac AS MacAddress, COUNT(src_ip) AS n
        FROM (
            SELECT DISTINCT src_mac, src_ip
            FROM ${ORG}.NetEvent
            WHERE (
                ( time > ( now() - interval 24 hour ) ) AND
                ( src_ip != \"000.000.000.000\" ) AND
                ( src_ip != \"0.0.0.0\" ) AND
                ( src_ip IS NOT NULL) AND
                ( src_sim IS NULL )
            )
        ) AS t1
        GROUP BY src_mac
    ) AS t2
    WHERE
        ( n > 1 );
"

echo ${sql} | \
mysql \
    --ssl \
    -h${DatabaseHostname} \
    -u${DatabaseUser} \
    -p${DatabasePassword}
Introduction to Policy Triggers
Triggers are the foundation of Ridgeback's policy engine, serving as the mechanism for detecting specific network events or conditions. A trigger is essentially a SQL query that monitors network traffic, device behavior, or other defined criteria. When the conditions of a trigger are met, Ridgeback policies can respond with appropriate actions, such as generating alerts, logging activity, or taking automated remediation steps.
Why Use Triggers?
Triggers are powerful tools for network defense because they:
- Monitor Critical Events: Identify unusual or unauthorized behavior, such as devices joining the network or multiple phantoms being contacted.
- Automate Responses: Work seamlessly with policies to take action when specific conditions occur.
- Customize Security: Tailor detection and response to meet the unique requirements of your organization.
How Triggers Work
- SQL Query-Based Detection: Each trigger is defined by a SQL query that extracts specific information from Ridgeback’s data sources. These queries are tailored to look for patterns, anomalies, or specific network events.
- Event-Driven Execution: Triggers evaluate data continuously or periodically, depending on the use case, and activate policies when conditions are met.
- Integration with Policies: Triggers are used as building blocks for Ridgeback policies, providing the logic needed to determine when a policy should take effect.
Writing Effective Triggers
When writing trigger queries, consider the following:
- Focus on Key Indicators: Identify the critical events or behaviors you want to monitor.
- Use Clear Criteria: Ensure that your SQL query accurately captures the conditions of interest without unnecessary complexity.
- Test Queries Thoroughly: Run triggers in a test environment to verify their accuracy and performance before deployment.
Example Use Cases
Below are examples of common triggers:
- Phantom Contact: Detect when a single host interacts with multiple phantoms within a short time frame.
- Device Joining the Network: Identify when new devices connect to specific networks.
These examples, along with production and experimental queries provided later in this chapter, demonstrate the versatility of triggers in implementing robust network policies.
Sample Policy Triggers
Phantom Contact
- "when any single host touches three or more phantoms in a ten minute window"
SELECT
    "Called 3+ phantoms within the last 10 minutes." AS Reason,
    CoreLabel AS Segment,
    src_ip AS LiveIpv4Address
FROM NetEvent
JOIN Core AS Core
	ON NetEvent.CoreId = Core.CoreId
WHERE
  src_ip IS NOT NULL AND
  dst_ip IS NOT NULL AND
  src_sim IS NULL AND
  dst_sim IS NOT NULL AND
  time > DATE_SUB(NOW(), INTERVAL 10 MINUTE)
GROUP BY Segment, src_ip
HAVING COUNT(DISTINCT dst_ip) >= 3;
-- Returns a list of endpoints that have contacted at least three phantoms in the last 10 minutes.
Device Joining a Network
- "when a new device is added to specific networks"
SELECT distinct
	"New device join." AS Reason,
    CoreLabel AS Segment,
    src_mac AS NewMacAddress,
    src_ip AS NewIpv4Address
FROM NetEvent
JOIN Core AS Core
	ON NetEvent.CoreId = Core.CoreId
WHERE
  ( time >= ( NOW() - INTERVAL 10 MINUTE ) ) AND
  ( src_ip IS NOT NULL ) AND
  ( src_ip != "000.000.000.000" ) AND
  ( src_ip != "0.0.0.0" ) AND
  ( src_sim IS NULL ) AND
  src_mac NOT IN (
    SELECT DISTINCT src_mac
    FROM NetEvent
    WHERE
      ( time > ( NOW() - INTERVAL 10 * 2 MINUTE ) ) AND
      ( time < ( NOW() - INTERVAL 10 MINUTE ) ) AND
      ( src_mac IS NOT NULL ) AND
      ( src_sim IS NULL )
  );

-- Returns a list of new devices that have joined within the last 10 minutes.
-- Change the three instances of 10 to be what you want.
Older Stuff Below
- Note! If copying and pasting into the Policy Trigger Query Management page be sure to NOT copy the remarks at that start of queries. The
query gets formated as one line, and everything after the -- will be treated as a comment. The result of starting with a
--explanation of the query
is that the whole SQL query gets commented out and doesn't do anything.
Production Trigger Queries
-- --------------------------
-- PRODUCTION TRIGGER QUERIES
-- --------------------------

-- MAC addresses mapped to more than one IPv4 address (or IPv4 changed)
-- over the last 24 hours
SELECT MacAddress, n
FROM (
    SELECT src_mac AS MacAddress, COUNT(src_ip) AS n
    FROM (
        SELECT DISTINCT src_mac, src_ip
        FROM NetEvent
        WHERE (
            ( time > ( now() - interval 24 hour ) ) AND
            ( src_ip != "000.000.000.000" ) AND
            ( src_ip != "0.0.0.0" ) AND
            ( src_ip IS NOT NULL ) AND
            ( src_sim IS NULL )
        )
    ) AS t1
    GROUP BY src_mac
) AS t2
WHERE
    ( n > 1 );

-- IPv4 addresses mapped to more than one MAC address (or MAC changed)
-- over the last 24 hours
SELECT Ipv4Address, n
FROM (
    SELECT src_ip AS Ipv4Address, COUNT(src_mac) AS n
    FROM (
        SELECT DISTINCT src_mac, src_ip
        FROM NetEvent
        WHERE (
            ( time > ( now() - interval 24 hour ) ) AND
            ( src_ip != "000.000.000.000" ) AND
            ( src_ip != "0.0.0.0" ) AND
            ( src_ip IS NOT NULL ) AND
            ( src_sim IS NULL )
        )
    ) AS t1
    GROUP BY src_ip
) AS t2
WHERE
    ( n > 1 );


-- New MAC addresses seen in the last 24 hours
SELECT DISTINCT src_mac AS NewMacAddress
FROM NetEvent
WHERE (
    ( time > ( now() - interval 24 hour ) ) AND
    ( src_sim IS NULL ) AND
    src_mac NOT IN (
        SELECT DISTINCT src_mac
        FROM NetEvent
        WHERE (
            ( time > ( now() - interval 48 hour ) ) AND
            ( time < ( now() - interval 24 hour ) ) AND
            ( src_sim IS NULL )
        )
    )
);

-- New IPv4 addresses seen in the last 24 hours
SELECT DISTINCT src_ip AS NewIpv4Address
FROM NetEvent
WHERE (
    ( time > ( now() - interval 24 hour ) ) AND
    ( src_ip != "000.000.000.000" ) AND
    ( src_ip != "0.0.0.0" ) AND
    ( src_ip IS NOT NULL) AND
    ( src_sim IS NULL ) AND
    src_ip NOT IN (
        SELECT DISTINCT src_ip
        FROM NetEvent
        WHERE (
            ( time > ( now() - interval 48 hour ) ) AND
            ( time < ( now() - interval 24 hour ) ) AND
            ( src_sim IS NULL )
        )
    )
);

-- MAC addresses that disappeared in the last 24 hours
SELECT DISTINCT src_mac AS NewMacAddress
FROM NetEvent
WHERE (
    ( time > ( now() - interval 48 hour ) ) AND
    ( time < ( now() - interval 24 hour ) ) AND
    ( src_sim IS NULL ) AND
    src_mac NOT IN (
        SELECT DISTINCT src_mac
        FROM NetEvent
        WHERE (
            ( time > ( now() - interval 24 hour ) ) AND
            ( src_sim IS NULL )
        )
    )
);

-- IPv4 addresses that disappeared in the last 24 hours
SELECT DISTINCT src_ip AS NewIpv4Address
FROM NetEvent
WHERE (
    ( time > ( now() - interval 48 hour ) ) AND
    ( time < ( now() - interval 24 hour ) ) AND
    ( src_ip != "000.000.000.000" ) AND
    ( src_ip != "0.0.0.0" ) AND
    ( src_ip IS NOT NULL) AND
    ( src_sim IS NULL ) AND
    src_ip NOT IN (
        SELECT DISTINCT src_ip
        FROM NetEvent
        WHERE (
            ( time > ( now() - interval 24 hour ) ) AND
            ( src_sim IS NULL )
        )
    )
);
Experimental Trigger Queries
-- -----------
-- EXPERIMENTS
-- -----------

-- Distinct, live src_mac/src_ip, sorted by src_ip
SELECT DISTINCT src_mac, src_ip
FROM NetEvent
WHERE time > '2022-04-22' AND time < '2022-04-23' AND src_ip != "000.000.000.000" AND src_sim IS NULL
ORDER BY src_ip;

-- Distinct, live src_mac/src_ip, sorted by src_mac
SELECT DISTINCT src_mac, src_ip
FROM NetEvent
WHERE time > '2022-04-22' AND time < '2022-04-23' AND src_ip != "000.000.000.000" AND src_sim IS NULL
ORDER BY src_mac;

-- MAC addresses mapped to more than one IP address (or IP changed)
SELECT MacAddress, n
FROM (
    SELECT src_mac AS MacAddress, COUNT(src_ip) AS n
    FROM (
        SELECT DISTINCT src_mac, src_ip
        FROM NetEvent
        WHERE time > '2022-04-22' AND time < '2022-04-23' AND src_ip != "000.000.000.000" AND src_sim IS NULL) AS t1
    GROUP BY src_mac
) AS t2
WHERE n > 1;

-- IP addresses mapped to more than one MAC addresses (or MAC changed)
SELECT Ipv4Address, n
FROM (
    SELECT src_ip AS Ipv4Address, COUNT(src_mac) AS n
    FROM (
        SELECT DISTINCT src_mac, src_ip
        FROM NetEvent
        WHERE time > '2022-04-22' AND time < '2022-04-23' AND src_ip != "000.000.000.000" AND src_sim IS NULL) AS t1
    GROUP BY src_ip
) AS t2
WHERE n > 1;


-- New IP addresses in second day.
SELECT DISTINCT src_ip AS NewIpAddress
FROM NetEvent
WHERE time > '2022-04-22' AND time < '2022-04-23' AND src_ip != "000.000.000.000" AND src_sim IS NULL AND src_ip NOT IN (
    SELECT DISTINCT src_ip
    FROM NetEvent
    WHERE time > '2022-04-21' AND time < '2022-04-22' AND src_ip != "000.000.000.000" AND src_sim IS NULL)
;

-- New MAC addresses in second day.
SELECT DISTINCT src_mac AS NewMacAddress
FROM NetEvent
WHERE time > '2022-04-22' AND time < '2022-04-23' AND src_sim IS NULL AND src_mac NOT IN (
    SELECT DISTINCT src_mac
    FROM NetEvent
    WHERE time > '2022-04-21' AND time < '2022-04-22' AND src_sim IS NULL)
;

-- --------------------------
-- PRODUCTION TRIGGER QUERIES
-- --------------------------

-- MAC addresses mapped to more than one IP address (or IP changed)
SELECT MacAddress, n
FROM (
    SELECT src_mac AS MacAddress, COUNT(src_ip) AS n
    FROM (
        SELECT DISTINCT src_mac, src_ip
        FROM NetEvent
        WHERE (
            ( time > ( now() - interval 24 hour ) ) AND
            ( src_ip != "000.000.000.000" ) AND
            ( src_ip != "0.0.0.0" ) AND
            ( src_sim IS NULL )
        )
    ) AS t1
    GROUP BY src_mac
) AS t2
WHERE
    ( n > 1 );

-- IP addresses mapped to more than one MAC addresses (or MAC changed)
SELECT Ipv4Address, n
FROM (
    SELECT src_ip AS Ipv4Address, COUNT(src_mac) AS n
    FROM (
        SELECT DISTINCT src_mac, src_ip
        FROM NetEvent
        WHERE (
            ( time > ( now() - interval 24 hour ) ) AND
            ( src_ip != "000.000.000.000" ) AND
            ( src_ip != "0.0.0.0" ) AND
            ( src_sim IS NULL )
        )
    ) AS t1
    GROUP BY src_ip
) AS t2
WHERE
    ( n > 1 );


-- New MAC addresses seen in last 24 hours.
SELECT DISTINCT src_mac AS NewMacAddress
FROM NetEvent
WHERE (
    ( time > ( now() - interval 24 hour ) ) AND
    ( src_sim IS NULL ) AND
    src_mac NOT IN (
        SELECT DISTINCT src_mac
        FROM NetEvent
        WHERE (
            ( time > ( now() - interval 48 hour ) ) AND
            ( time < ( now() - interval 24 hour ) ) AND
            ( src_sim IS NULL )
        )
    )
);

-- New IP addresses seen in last 24 hours.
SELECT DISTINCT src_ip AS NewIpAddress
FROM NetEvent
WHERE (
    ( time > ( now() - interval 24 hour ) ) AND
    ( src_sim IS NULL ) AND
    src_ip NOT IN (
        SELECT DISTINCT src_ip
        FROM NetEvent
        WHERE (
            ( time > ( now() - interval 48 hour ) ) AND
            ( time < ( now() - interval 24 hour ) ) AND
            ( src_sim IS NULL )
        )
    )
);

-- Blackholes seen in the last 24 hours.
SELECT
    a.src_ip,
    a.dst_ip,
    COUNT(a.time) AS count,
    MIN(a.time) AS firstSeen,
    MAX(a.time) AS lastSeen
FROM
    NetEvent a
LEFT JOIN (
    SELECT DISTINCT
        src_ip
    FROM
        NetEvent
    WHERE
        proto = 'arp'
        AND src_ip IS NOT NULL
        AND time > DATE_SUB(NOW(), INTERVAL 25 HOUR)
) b
ON
    b.src_ip = a.dst_ip
WHERE
    b.src_ip IS NULL
    AND time > DATE_SUB(NOW(), INTERVAL 24 HOUR)
GROUP BY
    a.dst_ip;
Security Event Management (SEM)
Security Event Management (SEM) is the practice of collecting, analyzing, and responding to security-relevant information and incidents within an organization’s IT environment. By effectively managing security events, IT teams can detect threats early, mitigate risks, protect sensitive data, and maintain compliance with regulatory requirements. This chapter introduces fundamental SEM concepts, guiding IT personnel through event detection, prioritization, incident response, and continuous improvement.
1. Introduction to Security Event Management (SEM)
Overview of SEM Concepts:
Security Event Management involves gathering data from various sources (firewalls, intrusion detection systems, servers, endpoints, and applications) to identify suspicious behaviors, policy violations, and potential intrusions. SEM focuses on consolidating and making sense of these event logs to provide actionable security intelligence.
Importance of Security Event Management:
- Early Threat Detection: SEM tools and processes help discover unauthorized access attempts, malware infections, or data exfiltration early.
- Compliance and Auditing: Many regulations require logging and monitoring. Proper SEM supports audits, incident reporting, and compliance demonstrations.
- Efficient Incident Response: By centralizing event data, SEM enables faster root-cause analysis and targeted remediation, reducing the impact of security incidents.
2. Event Types and Classification
Common Security Events:
- Unauthorized Access Attempts: Failed logins, brute-force authentication attempts, and privilege escalation attempts.
- Malware Incidents: Infections, ransomware triggers, or suspicious executables running on endpoints.
- Distributed Denial of Service (DDoS) Attacks: Unusually high network traffic aimed at overwhelming services.
Event Severity Levels:
- Low: Minor policy violations or routine scans.
- Medium: Suspicious activity that may warrant investigation, such as repeated failed logins.
- High: Ongoing attacks or confirmed breaches requiring immediate response.
Establishing clear classification criteria helps prioritize response efforts and allocate the right level of resources.
3. Event Detection and Logging
Real-Time Event Monitoring:
Collect logs from network devices, servers, endpoints, and applications. Use tools like syslog, Windows Event Forwarding, or cloud-based logging to aggregate data centrally. Real-time monitoring allows for timely detection and response.
Configuring Logging for Visibility:
- Enable detailed logs on critical assets (e.g., domain controllers, ERP systems).
- Standardize logging formats and timestamps for easier correlation.
- Apply log rotation and retention policies to prevent data loss and maintain compliance.
Event Sources and Log Types:
- Firewalls and IDS/IPS: Network traffic patterns, blocked connections, or intrusion attempts.
- Endpoint Security Tools: Anti-malware events, suspicious process activity, USB insertions.
- Application Logs: Authentication requests, user activities, error messages indicating possible tampering.
4. Event Correlation and Analysis
Correlating Events Across Sources:
Combine logs from multiple systems to identify patterns that single data points might miss. For example, failed login attempts on a server followed by suspicious firewall traffic from the same source IP can indicate an ongoing intrusion attempt.
Threat Intelligence Integration:
Enhance event data with external threat intel feeds, known malicious IP addresses, signatures, and vulnerability databases to quickly identify known attack patterns.
Anomaly Detection and Behavioral Analysis:
Use machine learning or statistical techniques to spot deviations from normal behavior—e.g., an unusual spike in outbound traffic after hours or an admin account logging in from unfamiliar locations. (The challenge here is that "normal" usually is not well-defined.)
5. Event Prioritization and Risk Assessment
Identifying Critical vs. Non-Critical Events:
Focus on events that pose the greatest potential harm, such as attempted database extractions or privileged account misuse.
Impact and Risk Assessment Guidelines:
Evaluate the importance of affected systems, the sensitivity of involved data, and potential business impacts. High-value targets like financial systems or customer databases demand swift, robust responses.
Techniques for Prioritizing Response:
- Assign severity ratings and use a ticketing system for incident handling.
- Implement Service Level Agreements (SLAs) for different event types.
6. Alert Management
Configuring Alerts for Various Event Types:
Set up alerts for critical events (e.g., detection of malware) that immediately notify responders. Less critical events might generate daily summaries for later review.
Reducing False Positives:
Tune alert thresholds, whitelist known safe behavior, and refine detection rules to lower noise. Regularly review and adjust alert conditions.
Best Practices for Alert Handling:
Create a playbook that outlines what to do when specific alerts fire, ensuring consistent and efficient incident response.
7. Incident Response and Management
Initial Incident Triage and Containment:
Evaluate the severity of an alert, identify affected systems, isolate compromised hosts from the network, and contain damage before it spreads.
Escalation Procedures:
Establish a clear chain of command. If an incident surpasses the capabilities of the first responder, escalate to more experienced analysts or third-party incident response teams.
Post-Incident Review and Documentation:
After resolving an incident, document what happened, how it was handled, and what can be improved. Update policies, alerts, and training based on lessons learned.
8. Event Investigation and Forensics
In-Depth Event Investigation:
Examine event logs, network captures, and endpoint telemetry to reconstruct the attacker’s path and goals.
Forensic Analysis Tools and Techniques:
Use specialized tools to analyze memory dumps, disk images, or network packet captures. Maintain a strict chain-of-custody and ensure integrity of collected evidence.
Evidence Collection and Preservation:
Secure evidence in a manner that stands up to legal scrutiny if the incident leads to litigation or law enforcement involvement.
9. Reporting and Metrics
Generating Security Event Reports:
Produce regular reports for stakeholders—executives, compliance officers, IT management. Summarize event volumes, trending attack types, and response times.
Key Performance Indicators (KPIs):
Track mean time to detect (MTTD), mean time to respond (MTTR), and frequency of false positives. Use these metrics to measure program effectiveness.
Compliance Reporting and Audit Requirements:
Produce audit trails that satisfy regulatory mandates (e.g., PCI DSS, HIPAA, GDPR). Demonstrate proper event handling and timely response to auditors.
10. Automation and Integration
Automation Tools to Streamline Event Management:
Leverage Security Information and Event Management (SIEM) platforms and Security Orchestration, Automation, and Response (SOAR) solutions to reduce manual workloads.
Integrating with Other Security Solutions:
Combine SEM with vulnerability management, endpoint detection and response (EDR), and threat intelligence platforms for a comprehensive defense-in-depth approach.
Workflow Automation for Response:
Automate routine responses—block suspicious IPs, disable compromised accounts—so teams can focus on complex threats.
11. Retention Policies and Data Privacy
Event Data Storage and Retention Requirements:
Determine how long logs should be kept based on regulatory and business needs. Strive for a balance between availability of data for investigations and cost constraints.
Ensuring Data Privacy and Compliance:
Protect logs containing personal data with encryption, access controls, and anonymization when possible.
Secure Data Disposal Practices:
Safely delete or destroy old logs to prevent unauthorized recovery and comply with data protection laws.
12. Ongoing Maintenance and Optimization
Regular Tuning and Updates to Event Management Settings:
Continuously refine detection rules, correlation logic, and alert thresholds as your environment and threat landscape evolve.
Reducing Noise and Improving Accuracy:
Prune unnecessary logs, remove redundant alerts, and invest in better parsing or normalization strategies.
Periodic Review of Incident Response Effectiveness:
Perform tabletop exercises, simulate attacks, and evaluate whether the SEM process effectively reduces risk and improves response quality.
13. Training and Awareness
Educating Users on Event Management Importance:
Users should understand why logging and monitoring matter. Encourage them to report suspicious activities promptly.
Training Responders on Handling Events Effectively:
Offer hands-on training, certifications, and scenario-based exercises. Skilled responders drastically improve containment and remediation outcomes.
Compliance
In today’s interconnected world, ensuring compliance with regulatory requirements and industry standards is essential for protecting sensitive data, maintaining customer trust, and avoiding legal or financial repercussions. Compliance involves adhering to laws, policies, and guidelines that govern data protection, privacy, access controls, and incident response. This chapter introduces key compliance concepts, outlines common regulations, and provides guidance on implementing best practices to meet compliance obligations—especially relevant for IT teams without a formal compliance background.
1. Introduction to Compliance in Network Security
Overview of Compliance and Its Role in Network Security:
Compliance ensures that organizations follow established rules and standards designed to safeguard sensitive information, maintain data integrity, and uphold ethical business practices. In the context of network security, compliance adds structure and accountability, pushing organizations to implement robust security controls, continuous monitoring, and documented procedures.
Key Compliance Drivers:
- Industry Regulations: Laws like GDPR and HIPAA enforce strict data protection requirements.
- Data Protection and Privacy: Pressure from customers, partners, and governments to protect personal and financial data.
- Financial and Reputational Risk: Non-compliance can result in hefty fines, legal actions, and damage to an organization’s reputation.
2. Common Compliance Standards and Regulations
Overview of Major Standards:
- GDPR (General Data Protection Regulation): EU regulation focusing on personal data protection and user privacy rights.
- HIPAA (Health Insurance Portability and Accountability Act): U.S. law for safeguarding Protected Health Information (PHI).
- PCI-DSS (Payment Card Industry Data Security Standard): Global standard to secure payment card data.
- SOX (Sarbanes-Oxley Act): U.S. law that sets financial reporting and internal control standards, including IT controls.
Industry-Specific Requirements:
Different verticals (finance, healthcare, retail, government) have specialized frameworks. Familiarize yourself with regulations pertinent to your industry and geographic location.
3. Data Protection and Privacy Requirements
Data Classification and Handling:
Identify and classify data by sensitivity (e.g., public, confidential, restricted). Implement stricter controls for more sensitive data.
Personal Data Protection and User Privacy:
Respect consent, purpose limitation, and data minimization principles. Only collect data necessary for legitimate purposes, and secure that data against unauthorized access.
Data Minimization and Purpose Limitation:
Store only what you need, use it only for stated objectives, and delete it when it’s no longer required.
4. Access Control and Identity Management
Compliance Requirements for Access Control:
Ensure that only authorized individuals can access sensitive data. Implement role-based access control (RBAC) and follow the principle of least privilege.
Role-Based Access and Least Privilege Enforcement:
Assign users to roles that map to their job functions. Limit permissions so users have the minimum rights needed, reducing the attack surface.
Authentication and Authorization Best Practices:
Use strong password policies, multi-factor authentication (MFA), and session timeouts. Regularly review user accounts to remove stale or unused privileges.
5. Logging, Monitoring, and Audit Trails
Compliance Requirements for Logging and Monitoring:
Most regulations mandate comprehensive logging of security events. Ensure logs capture who did what, when, and from where.
Maintaining Audit Trails for Accountability:
Keep timestamped, tamper-evident logs. Use cryptographic integrity checks to ensure logs remain reliable.
Retention Periods for Audit Logs and Data:
Adhere to regulatory retention requirements—some laws require storing logs for months or years. Store archives securely and ensure easy retrieval for audits.
6. Encryption and Data Security
Encryption Standards for Data at Rest and In Transit:
Use strong cryptographic algorithms (e.g., AES-256) for data storage. Employ TLS or VPNs to protect data in transit.
Key Management and Cryptographic Requirements:
Secure key storage and rotation are critical. Restrict who can access keys and periodically update them to prevent exposure.
Data Masking and Anonymization Techniques:
Replace sensitive fields (like credit card numbers) with masked values. Use tokenization or anonymization to reduce the risk of data leaks.
7. Risk Assessment and Vulnerability Management
Conducting Regular Risk Assessments:
Identify and document threats, vulnerabilities, and the likelihood of exploitation. Assess the potential impact on operations and compliance.
Identifying and Managing Vulnerabilities:
Use regular scans, penetration tests, and patch management processes. Promptly fix high-risk vulnerabilities.
Compliance Requirements for Patch Management:
Many regulations require timely patching of known security flaws. Keep systems updated to avoid non-compliance and security incidents.
8. Incident Response and Breach Notification
Compliance-Driven Incident Response Policies:
Have a documented plan for handling breaches, including defined roles, escalation paths, and containment measures.
Reporting and Notification Timelines for Breaches:
Regulations like GDPR mandate reporting data breaches within tight deadlines (e.g., 72 hours). Know your obligations and be prepared to notify affected parties and authorities.
Documentation and Record-Keeping Requirements:
Document all incidents, responses, and lessons learned. This demonstrates diligence and may reduce penalties if regulators investigate.
9. Third-Party and Supply Chain Security
Evaluating Third-Party Vendor Compliance:
Assess vendors’ security controls and compliance posture before sharing data. Use questionnaires, audits, and third-party certifications.
Contractual Requirements for Data Protection:
Include data protection clauses in vendor contracts. Require adherence to your security policies and compliance standards.
Risk Management for Supply Chain Dependencies:
Monitor suppliers for changes in their security posture. Have contingency plans if a critical vendor fails to meet compliance requirements.
10. Compliance Reporting and Documentation
Regular Reporting Requirements:
Produce periodic compliance reports for executives, regulators, and auditors. Include evidence of controls, risk assessments, and policy enforcement.
Compliance Documentation and Record-Keeping Practices:
Maintain updated policies, procedures, training logs, and system configurations. Good documentation simplifies audits and fosters trust.
Preparing for Audits and Assessments:
Have a checklist of required evidence, conduct internal mock audits, and fix gaps before external reviewers arrive.
11. Employee Training and Awareness
Compliance Training for Staff:
Regularly train employees on policies, handling sensitive data, and spotting security threats. Ensure training materials are clear and practical.
Security Awareness Programs and User Responsibilities:
Help users understand their role in compliance—reporting suspicious activities, following password policies, not sharing accounts.
Documenting Training and Certification Compliance:
Keep records of who attended training and passed any required certifications. Some regulations require proof of ongoing education.
12. Compliance Automation and Tools
Leveraging Automation for Compliance Tasks:
Automate log collection, vulnerability scans, and compliance checks to reduce human error and save time.
Tools for Policy Enforcement and Compliance Reporting:
Use GRC (Governance, Risk, and Compliance) platforms, SIEM solutions, and policy management tools to streamline compliance workflows.
Integration with Security Information and Event Management (SIEM):
A SIEM can centralize logs, detect anomalies, and generate compliance reports, simplifying oversight and validation.
13. Policy Management and Governance
Developing and Enforcing Security Policies:
Create clear, written policies covering acceptable use, data handling, and incident response. Ensure leaders endorse and communicate these policies widely.
Governance Frameworks for Compliance (e.g., COBIT, ISO 27001):
Use recognized frameworks to structure your compliance program. Frameworks provide best-practice guidelines and common language for audits.
Periodic Policy Reviews and Updates:
Regularly revisit policies to ensure they remain relevant amid technological changes, emerging threats, and new regulations.
14. Continuous Compliance and Improvement
Proactive Approaches to Maintain Compliance:
Don’t treat compliance as a one-time project. Continuously monitor, update, and improve controls to adapt to evolving threats and standards.
Monitoring Changes in Regulations and Standards:
Stay informed about new laws, updated frameworks, and industry alerts. Adjust controls and documentation promptly to remain compliant.
Continuous Improvement of Compliance Processes:
Solicit feedback from auditors, staff, and external experts. Refine processes, add new tools, and enhance training programs to keep compliance fresh and effective.
15. Penalties and Consequences of Non-Compliance
Overview of Potential Fines and Penalties:
Non-compliance can lead to significant financial penalties (e.g., GDPR fines up to 4% of global turnover).
Reputational Impact of Non-Compliance:
A publicized breach or non-compliance case can damage customer trust and brand reputation, affecting long-term business prospects.
Legal Implications and Liability Concerns:
Executives and board members may face personal liability if severe negligence or willful non-compliance is proven.
Installation and Setup
System Requirements
- Supported Platforms: X86-based Windows, Mac, or Linux -- We do have ARM support deployed as an early release, and it can run on platforms like the Raspberry Pi.
- Capability: Must be able to run Docker containers and have a network connection to the segment you wish to monitor.
For more detailed requirements, refer to the Docker documentation and check the section on WSL 2 backend and x86_64 architecture.
Ridgeback Install Process (the basics)
Follow these clear steps to install Ridgeback:
-
Install Docker Desktop (Windows users only: Also install the Npcap network driver)
-
Download Ridgeback's install.html Save it to your Downloads folder.
-
Open install.html Follow the instructions in the file.
- Check off the first two boxes since you’ve already installed Docker and NPCAP.
- Copy/paste your license name and key into the provided boxes.
- Enter your email address to register and log in on the Ridgeback website.
- Input your network information (IP, MAC, Gateway) for the Rcore.
-
Download Ridgeback Files After filling in the details, click the button to download customized Ridgeback files. (Allow multiple file downloads if prompted by your browser.)
-
Run the Installation Script Execute the install-ridgeback file from your Downloads folder. This creates the Docker containers and sets up the run-active and run-passive scripts.
-
Launch Ridgeback Double-click the Ridgeback icon on your desktop to start the Rcore and connect to the local Ridgeback control server. Next Steps
- Register your user account on the Ridgeback website and log in.
- Ensure the Rcore continues running properly.
Ridgeback is now successfully installed!
Restarting Ridgeback After a Reboot
- Ensure Docker is running with the Ridgeback containers.
- Start the Rcore by double-clicking the Ridgeback icon on your desktop.
More Details: Ridgeback Installation Overview
Ridgeback uses Docker to run its control and analytics tools. To install Ridgeback, you need Docker Desktop installed on a machine in each store where Ridgeback will monitor network traffic.
The only component outside of Docker is the Rcore binary—a small program (less than 1 MB) that interacts directly with the network adapter. The Rcore monitors and protects all devices (computers, cameras, tools, etc.) on a network segment by detecting and preventing malicious traffic.
Typically, Rcore runs on the same machine that hosts Docker and the Ridgeback containers. However, in cases where the Ridgeback control suite can't directly access the desired network segment, Rcore can run on a different machine in that segment. The machine running Rcore must be able to communicate to the machine running Docker, using TCP/IP on port 19444, though they don't have to be on the same network.
Simplist Setup: The simplest setup is when Rcore and Docker run on the same machine.
System Requirements
- Windows 10/11 or Windows Server 2022 (or newer)
- Docker Desktop installed from Docker's official site. Use the WSL version of Docker, though this can run on a hypervisor as well.
Prerequisites for Rcore (Windows Machines)
- Npcap network driver: Download from Npcap.
- vcruntime140.dll: Download from Microsoft, though it is usually pre-installed on most systems.
If everything is installed on the same machine, the process is straightforward. Ridgeback provides a script that checks prerequisites and configures Rcore as part of the Docker installation.
Installation Process
-
Download install.html to the Downloads folder of the machine where Docker is installed.
-
Open install.html in a web browser (Edge, Firefox, Chrome).
-
Enter license details: Paste your license name, license key, and email accounts for the Ridgeback control suite.
-
Download customized install files to your Downloads folder by clicking the provided button.
-
Run install-ridgeback.cmd from the Downloads folder. The install-ridgeback.cmd performs the following:
- Creates a Ridgeback folder at C:\Program Files\Ridgeback\ (or backs up existing contents).
- Moves the necessary configuration files (e.g., docker-compose.yml and .env) to the Ridgeback folder.
- Starts Docker if it isn't running.
- Checks for npcap.dll and prompts you to download it if missing.
- Logs into the Ridgeback Docker repository and downloads the Ridgeback images.
- Creates Ridgeback and Database containers and initializes the database.
- Downloads the rcore-win.exe file.
- Moves the run-active.cmd and run-passive.cmd scripts to the Ridgeback folder.
- Creates a desktop shortcut to launch the Rcore and open the Ridgeback control server.
- Registers your user in the local control server.
- Cleans up the Downloads folder.
Additional Configuration (if using Ethernet)
If your network uses Ethernet instead of Wi-Fi, the run-active and run-passive scripts will need to be customized to work with the Ethernet adapter instead of the Wi-Fi adapter.
Helper Utility
The rcore-config.html utility, part of the Ridgeback control suite, helps you set up scripts with all possible Rcore parameters. This will be covered during installation.
License Key Management
The Ridgeback License
Ridgeback is a licensed, on-premise solution designed to keep all your network data securely on-site. Despite its local focus, Ridgeback periodically connects to a remote license server to authenticate your installation and validate product permissions. This ensures proper licensing while maintaining the highest standards of data security and privacy.
License Name and Key
Your Ridgeback license consists of two components:
- License Name: An identifier unique to your organization.
- License Key: A unique alphanumeric code provided when you purchase Ridgeback.
These credentials authenticate your installation and ensure access to Ridgeback's features. Keep your license name and key secure and do not share them with unauthorized individuals.
The License and the .env Configuration File
The .env file is a critical configuration file for Ridgeback. It stores environment variables, including your license details. During installation, the license name and key are automatically added to this file.
- Location: The
.envfile is typically located in the Ridgeback folder (e.g.,C:\Program Files\Ridgeback\on Windows). - Content Example:
LICENSE_NAME=YourOrganizationName
LICENSE_KEY=xxxxxxxx-xxxx-xxxx-xxxx-xxxxxxxxxxxx
When Ridgeback starts, it reads the license information from the .env file to authenticate with the Ridgeback license server.
The Ridgeback License Server
The Ridgeback license server verifies the license details during installation and periodically while Ridgeback is running. This ensures compliance and validates active support agreements. The process is seamless when:
- The machine has an active internet connection.
- License details in the
.envfile are correct.
If the machine hosting Ridgeback does not have internet access, offline licensing may be available. Contact Ridgeback support for assistance.
Troubleshooting License Issues
Common Problems and Solutions
-
Invalid License Error:
- Cause: Incorrect license name or key in the
.envfile. - Solution: Verify the details against your original license email. Correct any typos and restart Ridgeback.
- Cause: Incorrect license name or key in the
-
License Not Found:
- Cause: The
.envfile is missing or improperly configured. - Solution: Re-run the installation process or manually recreate the
.envfile with the correct license details.
- Cause: The
-
Connectivity Issues:
- Cause: The machine cannot connect to the Ridgeback license server.
- Solution: Ensure the machine has internet access. For firewalled environments, allow outbound connections on the necessary ports.
-
Expired License:
- Cause: The license subscription has ended.
- Solution: Renew your license by contacting Ridgeback sales or through the Ridgeback website. Update the
.envfile with the new license details.
Best Practices
- Regularly back up the
.envfile and license information to a secure location. - Notify Ridgeback support immediately if you suspect your license has been compromised.
- Keep your Ridgeback installation updated to ensure compatibility with the license server.
Proper license management ensures uninterrupted operation of Ridgeback and compliance with the licensing terms.
User Account Management
Topics to cover:
- The hierarchy of users.
- The superadmin users and their privileges.
- The admin users and their privileges.
- Normal users and their privileges.
- Adding and removing users.
- Password recovery via email.
- Reseting a user password.
- Multi-factor authentication (MFA).
How to Add a User to Ridgeback
By default, Ridgeback only allows users listed in the .env file to access the server. This ensures that only authorized users can view your data, though you can adjust these settings to allow anyone or restrict access to certain email domains.
User Permission Levels
Ridgeback has three permission levels for users:
- SuperAdmin: Can access all data, manage users, and more across all organizations.
- Admin: Can manage data and users within their assigned organization.
- User: Can view all data within their organization.
SuperAdmin and Admin users need to be specifically listed in the .env file. If you set AllowAnyUser to true, anyone can register with an email address as a User.
To restrict registration to specific email domains (like your company's), set the EmailEndsWith parameter to your domain.
Steps to Add Users
-
Open the
.envFile- Go to
\Program Files\Ridgeback\on Windows or~/Ridgeback/on Mac/Linux. - Open the
.envfile to edit the user lists.
- Go to
-
Add Users to the List
- Locate the
SuperAdminList,AdminList, orUserListin the.envfile. - Add emails to the appropriate list, separating each email with a comma (no spaces).
- Example:
AdminList=johnsmith@myco.com,ceo@myco.com,tco@myco.com
UserList=employee@myco.com,staff@myco.com,johnsmith@myco.com
- Locate the
-
Restart the Server
- After updating the
.envfile, you'll need to restart the Ridgeback server to apply changes.
- Open a command line window (Command Prompt, PowerShell, or Terminal).
- Navigate to the Ridgeback folder:
- On Windows:
cd \Program Files\Ridgeback\ - On Mac/Linux:
cd ~/Ridgeback/
- On Windows:
- Stop and Remove the Server Container:
- Run this command:
docker compose rm -sf server - If you receive a permissions error, use
sudo:sudo docker compose rm -sf server
- Run this command:
- Rebuild and Start the Server:
- Run the following command to rebuild and start the server in the background:
docker compose up -d server - Or, if necessary, use
sudo:sudo docker compose up -d server
- Run the following command to rebuild and start the server in the background:
- After updating the
-
Register New Users
- Any email addresses added in the
.envfile should now be registered athttps://localhost/#register. - Once registered, you can log in with the new user credentials.
- Any email addresses added in the
How to Delete a Specific User
Is a user unable to reset their password because your Ridgeback instance is not configured with an email server?
Here’s an example script to delete the account associated with sample_email@example.org. This script handles a single email address at a time. After running it, a browser window will open, allowing you to re-register the email address.
set local
SET email=sample_email@example.org
docker compose exec surface /usr/bin/mysql  -h %DatabaseHostname% -u %DatabaseUser% --password=%DatabasePassword% -e "USE CustomerDb; DELETE CustomerDb.User, CustomerDb.Permissions, AuthenticationDb.Auth, AuthenticationDb.Recovery FROM CustomerDb.User LEFT JOIN CustomerDb.Permissions     ON CustomerDb.User.UserId = CustomerDb.Permissions.UserId LEFT JOIN AuthenticationDb.Auth     ON CustomerDb.User.UserId = AuthenticationDb.Auth.UserId LEFT JOIN AuthenticationDb.Recovery     ON CustomerDb.User.UserId = AuthenticationDb.Recovery.UserId WHERE CustomerDb.User.Email = '%email%';"
echo The account for %email$ is deleted.
explorer "https://localhost/#register?email=%email%
pause
Configuration
Topics to cover:
Ridgeback is configured using the docker-compose.yml and .env files for the docker containers, and using the command line arguments for the Rcore.
- Using the browser-based installer for the service containers.
- Using the browser-based installer for the Rcore.
- Configuring the service containers with the .env file.
- Configuring the service containers with the docker-compose.yml file.
- Rcore configuraton settings.
- Configuring the Rcore using a wrapper script.
There are two main parts to Ridgeback: the service containers that run in Docker, and the Rcores that run as separate executables. The configuration for the service containers is stored in the docker-compose.yml file and in the .env file. (This is why we use docker compose to control the service containers.)
Service Container Configuration
Each container hosts a separate service, and each service has its own section in the docker-compose.yml file. The docker compose command will first read the docker-compose.yml file and then read the .env file to fill in any configuration variables. Most of the time you will only need to change the .env file to make changes to the service containers. However, in more advanced scenarios you may need to change the docker-compose.yml file itself.
If you installed Ridgeback using the browser-based quickstart utility, then that utility generated an executable script that automatically created the docker-compose.yml and .env files for you. The configuration values saved would be based on how you filled in the fields in the installer.
Rcore Configuration
By default, the Rcore reads its configuration from the command line. Each configuration item is either a key/value pair or a simple option. While you could type in all the configuration items each time you run the Rcore, it is best practice to create a script that starts the Rcore for you. This script can then contain all the Rcore parameters.
If you installed the Rcore using the browser-based quickstart utility, then you may have had the option to save scripts called run-active and run-passive. The run-active script turns on phantoms, and the run-passive script does not turn on the phantoms. Best practice is to run the Rcore in a passive mode until you have a good idea of how your network is operating. This gives you a chance to identify any endpoints that are critical to the network (like gateways, firewalls, routers, etc.) and any endpoints that need to perform reconnaissance (like vulnerability scanners and some routers and DHCP servers).
Setting up Email for Alerts
To receive emails from your Ridgeback installation, the Policy and Server containers need to be configured to send emails.
The .env file in your Ridgeback folder is where you add variables to pass into the containers, including your email server information. You can also input your email server details on the install.html page, which will populate your .env file.
Enabling App Passwords
For both Google and Microsoft, you'll need to enable two-step verification before you can create an App Password. The option to create an App Password won't appear until two-step verification is active.
For Gmail
If you use Gmail, set up an App Password here
specifically for Ridgeback, and use it as your password. When entering the Google App Password, make sure to remove any spaces.
Gmail SMTP Settings:
- EmailServerHost:
smtp-relay.gmail.com - EmailServerPort:
587 - EmailServerUsername: the email for which the app password was created
- EmailServerPassword: the app password (without spaces)
- EmailFrom:
yourEmail+Ridgeback@yourdomain.com
Tip: Gmail allows you to append extra information to your email by using a
+, making it easy to identify emails from your Ridgeback setup.
For Office365
If you use Office365, The place to create an App Password is here Or you can follow these steps to create an App Password:
- Sign in to your Office365 account.
- Go to the My Account page.
- Select Security.
- Choose Manage How I Sign In.
- Scroll down to App Password and click Create a New App Password.
- Highlight and Copy the app password it created for you.
- Paste this password into the
EmailServerPasswordfield in the form or.envfile.
Office365 SMTP Settings:
- EmailServerHost:
smtp.office365.com - EmailServerPort:
587 - EmailServerUsername: the email for which the app password was created
- EmailServerPassword: the app password
- EmailFrom: the email for which the app password was created
Checking and Troubleshooting
To see what is happening when the Ridgeback tries to send an email, you can send yourself a password reset email from the login page and view the docker desktop log for the server container to see if it has any errors. If there were no errors in the server container log, and you don't see the email, check your spam folder.
When you do get the email, you don'y need to actually change your password unless you have forgotten it. You can simply delete the email and have confidence that emails will get sent.
Steps needed after ANY change to the .env file If you are setting up email by editing the .env file, not from the form fields in the install.html, then you will need to remove and rebuild the containers that use the changed variables.
Currently, this is the server and policy containers.
The steps to do this are:
- open a command or terminal window
- navigate to the Ridgeback folder:
windows:
cd \program files\Ridgeback\linux:cd ~/ridgeback/ - stop and remove the containers:
docker compose rm -sf policy server - rebuild and run the containers:
docker compose up -d policy serverand you are done!
Security and Access Control
Securing Ridgeback and the systems that run it is fundamental to maintaining a safe and reliable network environment. This chapter outlines key aspects of Ridgeback’s security and access control measures, including managing user passwords, protecting database credentials, hardening servers and Rcore endpoints, and ensuring Ridgeback can safely coexist with users and their devices. Implementing these guidelines helps reduce the risk of unauthorized access, data breaches, and other security incidents.
User Password Management
Why It Matters: Strong user password policies ensure that only authorized individuals can access Ridgeback’s sensitive data and administrative capabilities. Without proper password management, attackers might leverage weak or default credentials to compromise accounts.
Best Practices:
- Use Strong, Complex Passwords: Require passwords that are at least 12 characters long and include uppercase and lowercase letters, numbers, and special characters.
- MFA Integration: Implement multi-factor authentication (MFA) to add an additional layer of security. You can combine passwords with time-based one-time passwords (TOTPs) by turning on two-factor authentication on the "Settings -> Account Security" screen.
- Password Managers: Encourage admins and users to store passwords in reputable password managers to avoid weak or reused credentials.
Database Password Management
Why It Matters: Ridgeback stores critical network metadata and configuration data in a MySQL-compatible database. If the database credentials are leaked or weakly secured, attackers could gain unauthorized read/write access, compromising network integrity and confidentiality.
Best Practices:
- Separate Accounts: Use distinct accounts for application access and administrative tasks. Grant only the minimum privileges needed for Ridgeback to function.
- Strong, Unique Passwords: Just as with user passwords, ensure database credentials are long, complex, and never reused.
- Secure Storage of Credentials: Store database passwords in the
.envfile with appropriate file permissions (e.g.,600on Linux). Consider using encrypted secrets management tools like HashiCorp Vault or AWS Secrets Manager for large deployments. - Rotate Database Credentials: Change database passwords if a staff member with access leaves or if a potential breach is suspected.
- TLS Encryption: Configure the database connection to use TLS/SSL, ensuring data is encrypted in transit and preventing attackers from intercepting credentials.
Hardening the Service Container Server
Why It Matters: The server running Ridgeback’s containerized services (e.g., analytics, policy, manager) is at the heart of your deployment. Compromising it could give attackers broad access to data and control over security measures.
Hardening Measures:
- Patch Management: Keep the host operating system and container runtime (e.g., Docker) updated with the latest security patches.
- Minimal Attack Surface: Uninstall or disable unnecessary services on the host system. Only run essential software.
- Firewall Rules: Restrict inbound and outbound traffic. Allow only the needed ports (e.g., HTTPS ports for web access, database ports if required).
- Endpoint Protection: Use endpoint protection software, like Windows Defender, and centralize logs for monitoring suspicious activities. Configure log retention policies aligned with your compliance requirements.
- Regular Audits: Periodically review file permissions, running services, and user accounts. Confirm that no unauthorized users have shell or management access.
Hardening an Rcore Computer
Why It Matters: Each Rcore endpoint sits directly on the network segment you’re monitoring or protecting. If compromised, an attacker could gain insight into your network operations or potentially manipulate traffic.
Hardening Measures:
- Lock Down the Host OS: Whether Windows, Linux, or macOS, ensure the Rcore host is fully patched and only running necessary services. Apply principle-of-least-privilege for user accounts.
- Disable Unneeded Services: For example, on Windows, disable services like LLMNR or mDNS if not required. On Linux, consider disabling
avahior other multicast services that are not needed. - Strict Firewall Controls: Limit inbound connections to the Rcore host. The Rcore should typically only need outbound connectivity to the Ridgeback manager service.
- Anti-Malware and EDR: Deploy reputable endpoint protection software or anti-malware tools on the Rcore host.
Having Ridgeback Coexist with Users
Why It Matters: Ridgeback monitors network segments that may include user devices and servers. Balancing strong security with user experience ensures operations are not hindered and helps maintain trust.
Guidelines for Coexistence:
- User Education: Inform users that Ridgeback is monitoring network segments for anomalous traffic and explain that their normal business functions are not restricted.
- Non-Disruptive Security: Ridgeback’s phantoms and security measures should not create latency or block legitimate traffic unnecessarily. Adjust phantom settings and policies accordingly.
- Clear Policies and Communication: Clearly communicate acceptable use policies, so users understand what constitutes suspicious behavior. This can reduce accidental triggering of Ridgeback’s security alerts.
- Incident Response Protocols: Ensure that IT/security teams respond swiftly and transparently if a user’s device is flagged. Offer guidance on remediation steps and explain the reasoning behind any restrictive action.
Managing the Containers
Ridgeback’s core functionality relies on a set of containerized services. These containers, running within Docker or a compatible container environment, provide portability, simplified deployments, and easier updates. This chapter guides you through the processes involved in managing these containers, from initial setup to routine operations, troubleshooting, and maintenance.
Installing Docker Desktop (Windows, macOS, Linux)
Docker Desktop provides a user-friendly interface and integrates seamlessly with Windows, macOS, and some Linux distributions:
-
Windows:
- Download Docker Desktop for Windows from https://docs.docker.com/desktop/install/windows-install/.
- Run the installer and follow the on-screen instructions.
- Enable WSL 2 backend if prompted. This is recommended for better performance and compatibility.
- After installation, launch Docker Desktop and ensure it’s running.
-
macOS:
- Download Docker Desktop for Mac from https://docs.docker.com/desktop/install/mac-install/.
- Drag and drop the Docker app into the Applications folder.
- Launch Docker Desktop and allow necessary permissions if prompted.
- Wait for Docker to start. The whale icon in the menu bar indicates the status.
-
Linux:
While Docker Desktop is available for Linux, many Linux users prefer Docker Engine directly. If you opt for Docker Desktop on Linux (supported on certain distributions):- Download the .deb or .rpm package as per your distro from https://docs.docker.com/desktop/install/linux-install/.
- Install using your package manager and follow the official instructions to start the Docker Desktop daemon.
Docker Desktop on Linux provides a GUI, but it’s optional. Most Linux admins prefer Docker Engine directly.
Installing Docker Engine for Linux
On Linux servers (Ubuntu, Debian, CentOS, RHEL, etc.), it’s often more efficient and resource-friendly to install the Docker Engine rather than Docker Desktop.
-
Update Repositories:
sudo apt-get update -
Install Dependencies (on Debian/Ubuntu):
sudo apt-get install ca-certificates curl gnupg lsb-release -
Add Docker GPG Key and Repository:
curl -fsSL https://download.docker.com/linux/ubuntu/gpg | sudo gpg --dearmor -o /usr/share/keyrings/docker-archive-keyring.gpg echo \ "deb [arch=$(dpkg --print-architecture) signed-by=/usr/share/keyrings/docker-archive-keyring.gpg] \ https://download.docker.com/linux/ubuntu $(lsb_release -cs) stable" | \ sudo tee /etc/apt/sources.list.d/docker.list > /dev/null -
Install Docker Engine:
sudo apt-get update sudo apt-get install docker-ce docker-ce-cli containerd.io -
Verify Installation:
sudo docker run hello-worldFor other distributions, consult the official Docker Engine installation guide and follow the equivalent steps.
Installing Proxmox Virtual Environment
Proxmox VE is a virtual environment platform that can host virtual machines and containers. To run Ridgeback’s container environment in Proxmox, you can:
- Install Proxmox VE following the official guide at https://www.proxmox.com/en/proxmox-virtual-environment/overview.
- Create a VM: Set up a virtual machine running a Linux distribution that supports Docker.
- Install Docker Engine inside that VM using the steps above.
- Deploy Ridgeback Containers as you would on a physical server.
Proxmox simplifies resource allocation and scaling, allowing you to adjust CPU, memory, and storage resources for your Ridgeback environment dynamically.
Downloading the Docker Images
Before you can run Ridgeback’s containers, you need the appropriate Docker images:
-
Obtain License and Credentials: Make sure you have your Ridgeback license and any required credentials for accessing the Ridgeback container registry.
-
Login to the Container Registry (if required):
docker login <registry.example.com> -u <username> -p <password>Replace
<registry.example.com>with the Ridgeback registry endpoint provided in your documentation or by the support team. -
Pull the Images: Once authenticated, pull the required images:
docker pull <registry.example.com>/ridgeback/manager:latest
docker pull <registry.example.com>/ridgeback/server:latest
docker pull <registry.example.com>/ridgeback/policy:latest
docker pull <registry.example.com>/ridgeback/analytics:latest
docker pull <registry.example.com>/ridgeback/enrichment:latest
docker pull <registry.example.com>/ridgeback/surface:latest
Consult the Ridgeback documentation for the exact set of service images required. The
latesttag may be replaced by a specific version tag for production environments.With docker compose and a
docker-compose.ymlfile, the process of pulling images can be simplified to a single command:docker compose pull
Creating the Service Containers
Once Docker and the images are ready, you can create service containers using either docker run commands or a docker-compose.yml file:
-
Using Docker Compose:
docker compose up -dEnsure your
docker-compose.ymland.envfiles are properly configured. The.envfile will hold variables like database credentials, license information, and email server configuration. -
Manually Running Containers:
For advanced scenarios, run containers directly:docker run -d --name ridgeback-server -p 443:443 <registry.example.com>/ridgeback/server:latestRepeat for other service containers, ensuring the correct environment variables and volume mounts are set.
Note: The recommended approach is to use the docker-compose.yml file provided by Ridgeback, as it simplifies orchestrating multiple containers and ensures consistent configuration.
Starting and Stopping the Service Containers
-
Start Containers:
If using Docker Compose:docker compose up -dIf containers were previously stopped:
docker compose start -
Stop Containers:
docker compose stopOr, to remove them from the foreground:
docker compose down -
Individual Container Control:
docker stop ridgeback-server
docker start ridgeback-server
Removing Service Containers
If you need to remove containers (e.g., for a clean reinstall):
-
Stop and Remove:
docker compose rm -sfThis removes the containers defined in
docker-compose.yml. -
Remove Specific Containers:
docker stop ridgeback-server
docker rm ridgeback-server
Warning: Removing containers does not remove volumes or networks by default. Review and remove them if needed:
docker volume ls
docker volume rm <volume_name>
docker network ls
docker network rm <network_name>
Reviewing Service Container Logs
Logs are essential for troubleshooting and verifying that Ridgeback services are running correctly.
-
View Logs from All Services:
docker compose logs -
View Logs for a Specific Service:
docker compose logs server -
Follow Logs in Real-Time:
docker compose logs -f server
These logs provide insights into issues like database connection problems, license verification errors, or email alerts. Regularly reviewing logs aids proactive maintenance.
Special Issues for a Computer (like a Laptop) That Is Not Always Running
Ridgeback’s containers are generally expected to run continuously. If you install on a laptop or a system that frequently sleeps or shuts down:
- Persistent Storage: Ensure that data volumes and the database are stored on durable storage so that temporary interruptions don’t cause data loss.
- Startup Scripts: Create startup scripts or systemd services to automatically run
docker compose up -dwhen the machine boots. - Check Time Sync: Laptops often sleep, causing time drift. Ensure NTP or system clock sync is enabled so that Ridgeback’s timestamps and license checks remain accurate.
- Cloud-Based Database: If using a cloud-hosted database, verify that network connectivity is restored before Ridgeback services start, or they might fail to connect initially.
Updating the Server Certificate
Ridgeback’s server container likely uses TLS for secure web access. Certificates expire and may need renewal:
-
Obtain a New Certificate and Key from a trusted CA or your internal PKI.
-
Replace the Certificate in the keys folder in the server container (e.g.,
/usr/src/app/keys):cp new_cert.pem /usr/app/keys/cert.pem cp new_key.pem /usr/app/keys/key.pem -
Update docker-compose.yml if Needed: Ensure it references the correct certificate paths.
-
Restart the Container:
docker compose rm -sf server
docker compose up -d server
The service should now run with the updated certificate.
Log Management and Monitoring
Effective log management and monitoring are essential components of maintaining a secure and stable Ridgeback environment. Logs are the digital footprints of your Ridgeback deployment, offering insights into operational performance, security events, configuration issues, and network health. This chapter discusses different log sources—service container logs, Rcore logs, and network event logs—and explains how to use them for troubleshooting, auditing, and ongoing network monitoring.
The Service Container Logs
What Are They?
Service container logs are generated by Ridgeback’s collection of containers—such as the server, policy, analytics, enrichment, and surface services. These logs primarily include:
- Startup and Shutdown Messages: Confirming whether containers launch correctly and shut down gracefully.
- Configuration Warnings: Issues with reading
.envvariables, connecting to external services (like the database or email servers), and missing resources. - Runtime Errors and Exceptions: Detailed error messages when a service encounters unexpected conditions, such as database query failures or invalid API requests.
- Informational Alerts: Notifications about normal operations, periodic tasks, policy triggers, or license checks.
How to Access Service Container Logs:
-
Docker CLI:
docker compose logs
docker compose logs server
docker compose logs -f policy
Adding
-f(follow) lets you stream logs in real-time. -
Docker Desktop / Other GUI Tools:
If using Docker Desktop or another GUI, view logs via the containers’ GUI interface. -
Centralized Log Management (Optional):
Consider exporting logs to a centralized log management system like ELK (Elasticsearch, Logstash, Kibana) or Splunk. This allows indexing, searching, and correlation with other infrastructure logs.
Use Cases:
- Troubleshooting Startup Issues: If a container fails to start, check logs for missing environment variables or invalid configs.
- Monitoring Policy Trigger Outcomes: Identify when policies fire actions or generate alerts.
- Performance Analysis: Look for signs of slow queries or timeouts that might indicate performance bottlenecks.
Retention and Rotation:
By default, Docker may store logs indefinitely. Configure log rotation (e.g., in docker-compose.yml with a logging section) to prevent disks from filling up:
logging:
  driver: "json-file"
  options:
    max-size: "10m"
    max-file: "3"
The Rcore Logs
What Are They?
Rcores run as executables that capture network packets, identify endpoints, and implement phantom responses. Rcore logs record:
- Startup Parameters: Which command line arguments were used, which interfaces are monitored.
- Link Status Changes: Notices if the Rcore sees interface link up/down events.
- Anomalies and Warnings: Packets that do not parse correctly, attempts to contact nonexistent services, or timing information if the Rcore is struggling to keep up with traffic.
- Phantom Activation: Information about when and why a phantom was triggered (if active mode is used).
How to Access Rcore Logs:
- Console Output: If you run Rcore via a terminal (e.g.,
./rcore-win.exe ...), logs will appear in the console. - Redirecting Logs to a File:
Keep these files secure, as they can contain sensitive network metadata../rcore-linux --arguments > rcore.log 2>&1 - Systemd or Startup Scripts: If running Rcore as a systemd service:
journalctl -u rcore.service - Remote Logging: If needed, consider sending logs to a remote syslog server for centralized analysis.
Use Cases:
- Validation of Rcore Configuration: Check if Rcore accepted the provided parameters or if it reports issues with the chosen network interface.
- Phantom Behavior Analysis: If phantoms are not appearing or are too aggressive, logs can help fine-tune settings.
- Network Troubleshooting: Identify if the Rcore detects abnormal traffic patterns, time synchronization issues, or missing gateway configurations.
Rotation and Retention:
Rotate Rcore logs using standard OS mechanisms (e.g., logrotate on Linux) to avoid huge log files:
sudo nano /etc/logrotate.d/rcore
Configure a rotation policy that suits your retention and compliance requirements.
The Network Event Log
What Is It?
Ridgeback records network events—such as ARP requests, DNS queries, TCP connection attempts, ICMP pings—as structured data in the database. Unlike service container or Rcore logs (which focus on the operations of the Ridgeback system itself), the network event log focuses on the actual network traffic observed, providing a historical record of network behavior.
Where Is It Stored?
The network event logs are stored in the Ridgeback database, typically in tables like NetEvent. They include fields such as source/destination IPs, timestamps, event types, and whether the traffic was associated with a phantom or a live endpoint.
How to Access and Query:
- Ridgeback UI: Use the web-based interface to browse and filter events. Search for endpoints, time ranges, or event types to identify patterns or suspicious activity.
- Direct SQL Queries:
This can be useful for custom reports, policy triggers, or integrating with external analytics tools.SELECT * FROM Data_00000000_0000_0000_0000_000000000000.NetEvent WHERE time > NOW() - INTERVAL 1 HOUR ORDER BY time DESC; - API Integration: Some Ridgeback deployments may have an API to extract events programmatically.
Use Cases:
- Forensics and Incident Response: Investigate suspicious behavior by reviewing historical event data. For example, identify which endpoints attempted to contact a phantom or connected to an unknown IP address.
- Network Baseline: Establish normal traffic patterns by analyzing event data over time, detect anomalies more easily.
- Policy Enforcement Verification: Check if policies that block or alert on certain traffic patterns are working correctly. The network event log confirms whether corresponding events occurred.
Retention and Pruning: The network event data can grow large over time. Implement a pruning strategy:
- Data Retention Policies: Depending on compliance or forensics needs, keep data for a set period (e.g., 90 days).
- Database Maintenance: Use database tools (e.g.,
DELETEqueries, or partitioning) to remove old data and keep the database performing efficiently. - Backups: Regularly back up the NetEvent tables if required for long-term archival.
Combining Logs for Comprehensive Monitoring
Correlating Logs:
- Rcore + Container Logs: If a container reports frequent database timeouts at the same time the Rcore logs show network instability, you have a clue that underlying network issues affect both data ingestion and service responses.
- Network Events + Policy Logs: If a policy alert fires off, review the corresponding network events and container logs to see what triggered it and confirm correct behavior.
Alerts and Automation:
- Integrate logs into a SIEM (Security Information and Event Management) solution. Parse logs for keywords or anomalies and raise alerts when suspicious patterns emerge.
- Automate reports: Generate daily summaries of top talkers, recurring phantom triggers, or policy violations. Use container logs and network event data to provide a full picture of network health.
Best Practices for Log Management
- Ensure Time Synchronization: Make sure that all systems (Rcore host, container host, database server) use NTP. Accurate timestamps are crucial for correlating events.
- Limit Access to Logs: Restrict log file access to authorized personnel only. Logs may contain sensitive information such as IP addresses, hostnames, and event details.
- Regular Reviews: Don’t just collect logs—review them. Set up routines to watch for unusual patterns or performance issues.
- Test Incident Response Scenarios: Use historical logs to practice forensic exercises and improve response workflows.
Database Management
Ridgeback relies on a MySQL-compatible database to store network event data, configuration settings, policy triggers, user accounts, and more. Proper database management ensures efficient storage, quick access to data, and reliable long-term operation. This chapter covers how to select a compatible database, the pros and cons of containerized versus standalone deployments, how the database integrates into Ridgeback’s start order, and an overview of the databases and schemas that Ridgeback uses internally.
Selecting a Compatible Database
Compatibility and Requirements:
Ridgeback supports MySQL-compatible databases, which include:
- MariaDB: A common default choice. MariaDB is a drop-in replacement for MySQL with robust community support.
- MySQL Community Edition or Enterprise: The original MySQL distribution.
- Cloud-Hosted MySQL Services:
- Amazon RDS for MySQL
- Azure Database for MySQL
- Google Cloud SQL for MySQL
- MySQL-Compatible Engines: Any database that can speak the MySQL protocol and follow similar schemas.
Considerations:
- Performance: For high volumes of network events, choose a database known for good performance and scalability.
- Backup and Recovery: Ensure easy backup and restore procedures, especially if compliance requires data retention.
- Cost and Licensing: Some enterprise MySQL editions or certain managed cloud services involve licensing fees.
- Integration with Existing Infrastructure: Use a database type your IT team is familiar with, potentially aligning with existing backup scripts, monitoring tools, and expertise.
Recommended Default: For most on-premises deployments, MariaDB or MySQL Community Edition works seamlessly and is straightforward to set up.
Database in a Container (Local) vs. a Standalone Database
Database in a Container:
- Pros:
- Easy Setup: Ridgeback often provides a docker-compose configuration that can spin up a MariaDB instance quickly.
- Portability: Everything can run on a single machine for small deployments or demos.
- Simplified Maintenance: No separate provisioning of database servers; one command to bring it all up.
- Cons:
- Performance Limitations: Containers share resources with Ridgeback services, potentially impacting performance under heavy load.
- Limited Long-Term Storage: Container-based databases often rely on Docker volumes; if not carefully managed, you risk data loss when removing containers.
- Scaling Challenges: Harder to scale to large, multi-terabyte datasets.
Standalone Database:
- Pros:
- Better Performance and Scalability: Dedicated database servers with optimized hardware or cloud-managed solutions.
- Robust Backups and DR: Easier to integrate with enterprise backup solutions, snapshotting, and replication tools.
- Clear Separation of Concerns: The database is managed independently, making upgrades, patches, and scaling more flexible.
- Cons:
- Additional Complexity: Requires separate provisioning, configuration, and monitoring.
- Potential Additional Costs: A separate VM, cloud instance, or hardware might be needed.
Recommendation:
- For testing or small pilots: A containerized local database may suffice.
- For production or enterprise environments: A standalone MySQL/MariaDB instance or a managed cloud database is strongly recommended for reliability, scalability, and compliance.
Start Order and the Database
Ridgeback’s containers depend on the database being available and reachable before certain services start correctly. For example, the server, policy, or analytics containers may attempt database connections early in their startup process.
Key Points:
- Bring Up the Database First: If using a local or containerized database, run
docker compose up -d dbbefore other services. - Wait for DB Readiness: Some orchestration tools or health checks ensure that the database is ready (i.e., listening on the proper port and accepting connections) before the Ridgeback services attempt to connect.
- Failed Connections: If the database is not ready, Ridgeback services may fail to start or log connection errors. Restarting those containers after the DB is confirmed ready usually resolves the issue.
Tip: Use depends_on in docker-compose.yml files or write a small script that checks the database’s readiness before starting Ridgeback services.
The Databases Used by Ridgeback
Ridgeback logically separates data into multiple databases (or schemas) within the same MySQL-compatible server to organize data by function and security domain.
Common database names might include:
- CustomerDb: Holds core data related to endpoints, users, organizations, and policy configuration.
- AuthenticationDb: Dedicated for user authentication details, salted hashes, MFA tokens, and account recovery entries.
- EventDb (e.g., NetEvent tables): Stores large volumes of network event metadata. This is the heart of Ridgeback’s forensic and analytical capabilities.
- PolicyDb: Stores policy definitions, triggers, and related metadata.
- AnalyticsDb: May store aggregated metrics, reports, or computed insights.
Note: The exact naming conventions and which schemas are used may depend on the Ridgeback version. Consult the Ridgeback release notes or documentation for the most accurate and current database naming conventions.
The Database Schemas Used by Ridgeback
Ridgeback’s schemas (or databases) contain multiple tables that fulfill specific roles:
-
CustomerDb (Example):
- User Table: Basic user profiles (email, permissions).
- Permissions Table: Detailed ACLs and roles.
- Organization Table: Multi-tenant environments may store org-level data here.
-
AuthenticationDb:
- Auth Table: Stores user authentication credentials (hashed passwords, last login, failed attempts).
- Recovery Table: Password reset tokens, expiration times.
-
Data_XYZ (e.g., Data_00000000_0000_0000_0000_000000000000.NetEvent):
- NetEvent Table: The main event log of observed network activity.
- Endpoint or Device Table: Endpoint metadata, MAC/IP associations.
- DnsEvent, DhcpEvent, or ArpEvent Tables: If split by event type, these contain specific subsets of network events.
-
PolicyDb:
- Policy Table: Policy definitions and triggers.
- Action Table: Actions associated with policies, like sending an email alert.
-
AnalyticsDb (Optional or Combined):
- Aggregations: Precomputed summaries of events for quicker reporting.
- Metrics: Key performance indicators, risk indices, and summarized counts of recon attempts, active threats, etc.
Relationships and Indexes:
- Foreign keys may link user accounts in CustomerDb to events or actions in Data_XYZ schemas.
- Proper indexing is crucial for performance; Ridgeback’s schemas are typically optimized to handle large volumes of NetEvents and quick lookups by time, IP, or MAC address.
Customization or Direct Access:
-
Direct SQL queries can extract specific insights. For example:
SELECT src_ip, dst_ip, time
FROM Data_00000000_0000_0000_0000_000000000000.NetEvent
WHERE time >= NOW() - INTERVAL 1 HOUR
  AND dst_ip IS NULL;
This query might reveal endpoints probing unused IP addresses in the last hour.
-
Warning: Avoid schema alterations without consulting Ridgeback support. Changing table structures, indexes, or datatypes may break application logic or future upgrades.
Data Backup and Recovery
Ridgeback ensures robust network security by relying on three critical components: a MySQL-compatible database for historical data retention and forensics, a collection of service containers for extensibility, and Rcores for managing network traffic at the segment level. Protecting the data and configurations within this architecture is vital for continuity and operational integrity.
This chapter outlines comprehensive procedures for backing up and recovering Ridgeback’s key elements across various deployment scenarios. It provides guidance for environments using local MySQL, local MariaDB, MySQL in Azure, MySQL in AWS, and MariaDB in a container.
1. Backing Up and Restoring the Database
The MySQL-compatible database used by Ridgeback stores crucial information about IT infrastructure and network activity. Backups are essential to preserve this data for forensic analysis and long-term compliance with organizational retention policies.
Backup Procedures
Local MySQL/MariaDB
- Stop Ridgeback services to ensure no active connections to the database:
docker-compose down - Create a database dump using
mysqldump:mysqldump -u <username> -p --all-databases > ridgeback_backup.sql - Validate the dump by restoring it to a test database.
- Secure the backup file in encrypted storage or a secure offsite location.
MySQL in Azure
- Use Azure’s automated backup feature via the Azure Portal for routine backups.
- For manual backups, export the database using
mysqldump:mysqldump -h <azure_server>.mysql.database.azure.com -u <username>@<servername> -p <database> > ridgeback_backup.sql - Save backups to Azure Blob Storage or another secure repository.
MySQL in AWS
- Enable Amazon RDS automated backups or take manual snapshots via the AWS Management Console.
- To create a manual backup, use:
mysqldump -h <rds_endpoint> -P 3306 -u <username> -p <database> > ridgeback_backup.sql - Store the backup securely in S3 buckets or other encrypted storage solutions.
MariaDB in a Container
- Stop the container to avoid corrupting data during backup:
docker stop <container_name> - Use
docker execto runmysqldumpinside the container:docker exec <container_name> mysqldump -u <username> -p <database> > ridgeback_backup.sql - Copy the
.sqlfile out of the container for safe storage:docker cp <container_name>:/ridgeback_backup.sql .
Restore Procedures
- Stop Ridgeback services to ensure data integrity.
- Prepare the database:
- For local databases, create an empty database if necessary.
- For cloud services, use the provider’s portal to create a new instance or restore a snapshot.
- Import the backup:
- For local databases:
mysql -u <username> -p < ridgeback_backup.sql - For containers, use
docker exec:docker cp ridgeback_backup.sql <container_name>:/restore.sql docker exec <container_name> mysql -u <username> -p <database> < /restore.sql
- For local databases:
- Restart Ridgeback services to resume normal operations:
docker-compose up -d
2. Recovering from Deleted Service Images or Containers
The Ridgeback service containers host critical functionality. If images or containers are deleted, you can recover them using the steps below:
- Rebuild the containers:
- Use the
docker-compose.ymlfile and.envto pull the required images:docker-compose up -d
- Use the
- Reattach the database volume (if you are using an external volume) to restore data continuity:
docker run -v <volume_name>:/var/lib/mysql -d <image_name>
3. Recovering from Deleted Rcores
Rcores are essential for capturing and analyzing network traffic. If an Rcore is accidentally deleted:
- Reinstall the Rcore:
- Download and re-deploy the Rcore executable on the appropriate system.
- Refer to the system requirements for Windows, macOS, or Linux installations.
- Reconfigure network connectivity:
- Ensure the Rcore has an IP route to the Ridgeback service containers.
- Validate the setup:
- Use Ridgeback’s admin interface to verify the Rcore is operational.
Best Practices for Backup and Recovery
- Automate Backups: Schedule regular database and configuration backups.
- Test Restorations: Periodically restore backups to verify their integrity.
- Secure Backup Storage: Use encryption and secure offsite locations for backup files.
- Document Recovery Plans: Maintain up-to-date recovery documentation accessible to authorized personnel.
- Monitor Logs: Regularly monitor logs from containers and Rcores to detect anomalies early.
Managing the Rcores
The Rcore is a lightweight executable that runs on a host attached to a network segment you want to monitor or protect. It listens to network traffic, identifies endpoints, and can engage phantoms to disrupt unauthorized reconnaissance and active threats. Properly installing, running, and managing Rcores is essential for maximizing Ridgeback’s visibility and defensive capabilities.
How to Install and Uninstall an Rcore
Installation Steps:
-
Prerequisites:
- Ensure that the host meets system requirements (CPU, memory, and OS compatibility as outlined in Ridgeback’s documentation).
- Install any necessary dependencies like the Npcap driver on Windows, or ensure that packet capture libraries (e.g., libpcap) are present on Linux systems.
-
Download the Rcore Executable:
- Obtain the correct Rcore binary for your platform (Windows, macOS, Linux, ARM, etc.) from the Ridgeback distribution source or vendor portal.
- Place it in a secure, well-known directory (e.g.,
C:\Program Files\Ridgeback\on Windows or~/ridgeback/on Linux).
-
Initial Configuration:
- Prepare any required command-line arguments. Rcores typically require specifying the network interface, manager server address, license credentials, and optional phantom or passive mode flags.
- Create a script (
run-rcore.shorrun-rcore.cmd) or a systemd unit file for more convenient startup.
Uninstallation Steps:
- Stop the Rcore (see below).
- Remove Executable and Scripts: Delete the Rcore binary and any related scripts from the system.
- Clean Up Configuration Files: Remove or redact any
.envfiles, logs, or other data stored locally if they are no longer needed. - Restore the Original Network Configuration: If you made changes to system services or firewall rules specifically for Rcore operation, revert them if you are no longer using Rcore on that host.
How to Start and Stop an Rcore
Starting the Rcore:
-
Command Line:
./rcore-linux --license-name=YourOrg --license-key=XXXX-XXXX-XXXX \
  --manager-server=192.168.1.100 --core-id=core1 \
  --downlink=eth0 --phantom-arp --phantom-icmp
Adjust arguments based on your environment. Options like
--show-tcpor--track-dhcpenable detailed tracking. -
From a Script:
Create a script (run-active.shorrun-passive.cmd) that contains all arguments. Running./run-active.shthen starts the Rcore in active mode without retyping everything.
Stopping the Rcore:
- Keyboard Interrupt: If started in a terminal, press
Ctrl+Cto stop. - Kill Command: If running in the background:
pkill rcore-linux - Windows: Use Task Manager or
taskkill /IM rcore-win.exe /Fto stop it if needed.
Automatic Restart:
For production deployments, consider a watchdog script or systemd service to restart the Rcore if it exits unexpectedly.
Review Rcores in the UI
Ridgeback’s UI provides a way to see which Rcores are currently active, their status, and which segments they cover:
-
Log into the Ridgeback Web UI:
Accesshttps://<Ridgeback_Server>in your browser and log in with appropriate credentials. -
Navigate to the Rcore Status Page:
There is typically a section like "Rcores" or "Cores" in the administrative or monitoring area of the UI.- Each Rcore is listed by
CoreId. - Status indicators (green/red) show if Ridgeback’s manager service can communicate with the Rcore.
- Each Rcore is listed by
-
Inspect Rcore Details:
The UI may show the network interface, the mode (active/passive), last heartbeat time, and any errors reported. You can use this to confirm that your Rcore is properly connected and recognized by the Ridgeback manager.
Running the Rcore as a Service
For stable, long-term deployments, running the Rcore as a persistent service ensures it restarts automatically after host reboots or unexpected crashes.
On Linux (systemd example):
-
Create a unit file
/etc/systemd/system/rcore.service:[Unit] Description=Ridgeback Rcore Service After=network.target [Service] Type=simple ExecStart=/usr/local/bin/rcore-linux --license-name=YourOrg --license-key=XXXX-XXXX \ --manager-server=<manager_ip> --core-id=core1 --downlink=eth0 --phantom-arp --phantom-icmp Restart=on-failure [Install] WantedBy=multi-user.target -
Enable and Start the Service:
sudo systemctl enable rcore
sudo systemctl start rcore
Check status with
systemctl status rcore.
On Windows (Scheduled Task or NSSM):
- Use NSSM (Non-Sucking Service Manager) to wrap
rcore-win.exeas a service:nssm install Rcore "C:\Program Files\Ridgeback\rcore-win.exe" --arguments ... nssm start Rcore - Ensure the service is set to auto-restart on failure and configured to run with the correct privileges.
Benefits:
- Automatic startup on reboot.
- Monitoring and restarts if it fails.
- Centralized log management via
journalctl(Linux) or Windows Event Logs if integrated.
Troubleshooting Rcore Issues
Common issues can arise during initial setup or after network changes. Here are some tips:
-
Rcore Not Appearing in UI:
- Check if the Rcore’s manager-server address is correct and reachable.
- Review Rcore logs for messages about failing to connect to the manager.
- Ensure firewalls or security groups allow communication on the required port (often TCP 19444).
-
No Network Events Being Recorded:
- Verify that the Rcore downlink or uplink interface is correct and that it sees actual traffic. Use
tcpdumporwiresharkon the host to confirm packets are flowing. - Check if run parameters like
--track-ipv4-privateor--track-ipv4-globalare set correctly to track the addresses you expect. - Confirm that phantoms or passive mode settings don’t prevent normal tracking.
- Verify that the Rcore downlink or uplink interface is correct and that it sees actual traffic. Use
-
Phantoms Not Activating:
- Ensure you started the Rcore with
--phantom-arp,--phantom-icmp, or--phantom-tcpflags if needed. - Check if time thresholds for phantoms are too long or ARP thresholds are not met.
- Review logs to see if Rcore complains about missing conditions to trigger phantoms.
- Ensure you started the Rcore with
-
Rcore Crashing or Exiting:
- Check logs for segfaults or panic messages.
- Update Rcore to the latest version if this is a known bug.
- Run the Rcore in a debugger or contact Ridgeback support for assistance.
Proactive Measures:
- Keep the Rcore updated with the latest version to benefit from performance improvements and bug fixes.
- Test new configurations in a lab environment before deploying changes into production.
- Regularly review logs and consider sending them to a centralized system to spot patterns in Rcore behavior.
Software Updates and Maintenance
Maintaining an up-to-date Ridgeback environment ensures you stay ahead of security vulnerabilities, performance issues, and compatibility breaks. This chapter focuses on upgrading service containers and Rcores, as well as managing database and log growth over time through pruning strategies. By incorporating regular maintenance into your routine, you’ll keep Ridgeback stable, secure, and performing optimally.
Upgrading the Service Containers
When to Upgrade:
- New Releases: Ridgeback periodically releases updates that may include security patches, performance optimizations, new features, and bug fixes.
- Support or Compliance: Organizational policies or compliance requirements might mandate keeping software at a supported version.
How to Upgrade:
-
Backup Current State:
- Export or snapshot the
.envanddocker-compose.ymlfiles. - Ensure you have recent database backups in case a rollback is needed.
- Export or snapshot the
-
Update Versions:
- Edit the image tags in your
docker-compose.ymlfile to be the version number you want to upgrade to. For example,server:3.0.0might be changed toserver:3.1.0. If you want to always stay up to date with the latest version 3, then use thelateststring in the version, like this:server:3.latest.
- Edit the image tags in your
-
Pull the Latest Images:
docker compose pullThis updates all referenced images to their newest versions available in the registry.
-
Recreate the Containers:
docker compose up -dThe
up -dcommand with updated images will recreate containers using the new versions. -
Check Logs and Status:
docker compose logs -fVerify no startup errors appear and confirm the Ridgeback UI is operational.
-
Post-Upgrade Testing:
- Log into the UI and confirm all services are running and accessible.
- Review a few policies, events, or reports to ensure functionality is intact.
Rollback Plan: If a new version introduces issues, stop the updated containers and revert to the previous known-good images:
docker compose down
docker compose up -d --build --no-cache
Use previously saved images (tagged or saved via docker save) or rely on your backups.
Upgrading the Rcores
When to Upgrade:
- New Rcore Binaries Released: Periodic Rcore releases improve packet handling, phantom logic, or introduce performance fixes.
- Feature Requirements: Some new policies or phantom modes require newer Rcore versions.
How to Upgrade:
-
Download the Latest Rcore Executable:
Obtain the new binary from the Ridgeback vendor portal or your internal repository. -
Stop the Existing Rcore:
systemctl stop rcoreor, if running manually,
Ctrl+Corkillthe process. -
Replace the Executable:
cp rcore-linux-newversion /usr/local/bin/rcore-linux
chmod +x /usr/local/bin/rcore-linux
On Windows, replace
rcore-win.exein the designated directory. -
Restart the Rcore:
systemctl start rcoreor run the startup script again.
-
Validate Operation:
- Check logs to ensure the Rcore connects to the manager and reports events.
- Confirm the Rcore status in the Ridgeback UI.
Rollback Plan: Keep a copy of the old Rcore binary. If the new one causes issues, revert by stopping the Rcore, restoring the old binary, and restarting.
Pruning the Databases and Logs
Over time, Ridgeback accumulates a large volume of network events and system logs. Pruning old data helps maintain database performance, reduces storage costs, and keeps logs manageable.
Pruning the Database
Why Prune:
- Performance: Huge NetEvent tables slow down queries and indexing.
- Cost: Cloud databases charge by storage; smaller datasets mean lower costs.
- Compliance: Some regulations require deleting data after a certain retention period.
How to Prune:
-
Establish a Retention Policy:
Decide how long to keep historical events—e.g., 90 days or 6 months. -
Use SQL Queries to Delete Old Data:
DELETE FROM NetEvent
WHERE time < NOW() - INTERVAL 90 DAY;
Run this during low-traffic hours. Consider batching deletions to avoid large performance hits.
-
Partitioning or Archiving:
- Consider using MySQL partitioning to manage data by date range, making pruning a matter of dropping old partitions.
- Export older data to CSV or another format for offline archival before deletion if needed.
-
Database Maintenance Tasks:
- After pruning, run
OPTIMIZE TABLEorANALYZE TABLEto improve performance. - Monitor free disk space and confirm improvements.
- After pruning, run
Pruning the Logs
Service Container Logs:
-
Docker Log Rotation:
Configure log rotation indocker-compose.yml:logging: driver: "json-file" options: max-size: "10m" max-file: "3"This automatically rotates container logs, keeping them within manageable sizes.
-
External Logging:
If using centralized logging (e.g., ELK or Splunk), apply retention policies or index lifecycles to prune old logs.
Rcore Logs:
- If Rcore logs are redirected to a file, use system tools like
logrotateon Linux:
Configure a rotation schedule, e.g., rotate weekly and keep 4 weeks of logs.sudo nano /etc/logrotate.d/rcore
Review Retention Policies Regularly:
- Adjust retention based on audit requirements, storage costs, and operational needs.
- Consider alerts to warn when logs or database tables approach size limits.
Best Practices for Maintenance
-
Routine Backups and Tests:
- Before any major upgrade or pruning operation, ensure you have recent, test-restored backups.
- Regularly test backup restores in a dev environment to confirm data integrity.
-
Scheduled Maintenance Windows:
- Perform upgrades, pruning, and heavy maintenance tasks during planned maintenance windows to minimize user impact.
- Notify stakeholders in advance.
-
Monitoring and Alerts:
- Set up alerts if the database grows too large or if logs are not rotating as expected.
- Monitor performance metrics like query response times or Rcore CPU usage after upgrades or pruning tasks.
-
Document Procedures:
- Keep a runbook or SOPs for upgrades, rollbacks, and pruning steps.
- Ensure multiple team members know how to execute these procedures.
Troubleshooting and Error Handling
Topics to cover:
- Why is my Rcore red?
- Help! My database ran out of space.
- Coexisting with static IP addresses in the data center.
- I can't login. (db not running, server started before db)
- How do I make email work?
Why is the Rcore red?
If the Rcore status page is showing an Rcore as red, but you think it should be green, check these:
- Is the Rcore actually running? Have you confirmed it is running by checking the process table?
- Does the coreid variable in the Rcore start script match the coreid variable in the Rcore status page?
Integrating with Other Tools and Systems
Topics to cover:
- Accessing the Ridgeback databases.
- Sample workflows and tool chains.
Glossary and Terminology
| Term | Definition |
|---|---|
| Active Threat | An endpoint that has contacted an unused address and has tried to exchange data. |
| Admin (account) | A Ridgeback account with administrative privileges for an organization. |
| Annotation | A label placed on a set of network events or other entities. |
| Automation | The process of setting up systems or tools to perform repetitive tasks or workflows without manual intervention. |
| Backup | A copy of data that is stored separately to ensure it can be restored in case of loss, corruption, or attack. |
| Black Hole (icon) | An icon representing where an Rcore observed traffic going to an endpoint, but no traffic was observed coming back. |
| Breach | An incident where unauthorized access to data, systems, or networks has occurred, potentially compromising security. |
| Broadcast | The transmission of data packets to all devices in a network segment rather than a specific recipient. |
| Capacity | The number of network addressable devices on a network. |
| Complexity (network) | A measure of the interconnectedness and intricacy of devices, protocols, and configurations in a network. |
| Complexity Histogram | A graphical representation showing the distribution of network complexity across various devices or segments. |
| Container | A lightweight, standalone software package that includes code and dependencies, isolated from the host system. |
| Data Leakage | Data unintentionally crossing between network segments. |
| Data Retention Policy | Guidelines governing the duration and method for storing and disposing of data within an organization. |
| Database | An organized collection of structured data that can be accessed, managed, and updated. |
| DFIR | Digital forensics and incident response. |
| Digital Forensics | The process of collecting, preserving, analyzing, and presenting digital evidence from electronic devices. |
| Disaster Recovery | A set of strategies and procedures to restore critical systems and data after a disruptive event. |
| DNS | The Domain Name System, which translates human-readable domain names to IP addresses for network routing. |
| Docker | An open-source platform for developing, shipping, and running applications in containers. |
| Endpoint | An address attached to a physical or virtual device used for communications. |
| Endpoint Load | The average number of endpoints per device. |
| Enumeration | The process of gathering detailed information about network devices and resources, often as a precursor to attacks. |
| Exploit | A piece of code or technique that takes advantage of a vulnerability to compromise a system or data. |
| Exposure (network) | The extent to which a network’s devices, data, or resources are visible or accessible to potential threats. |
| Exposure Histogram | A visual representation showing the frequency or level of exposure of devices or segments within a network. |
| Incident Response | An approach for responding to security incidents to minimize damage, recover operations, and prevent future incidents. |
| Insecure Hostname Request | A network request where a hostname is queried without encryption or authentication, potentially exposing data to threats. |
| IP Address | A unique identifier assigned to each device on a network, enabling it to communicate with other devices. |
| LLMNR | Link-Local Multicast Name Resolution, an insecure protocol for name resolution in small, local networks. |
| Lateral Movement | A technique used by attackers to move within a network to gain access to additional resources or data. |
| Layer 2 | The data link layer in the OSI model, responsible for node-to-node data transfer and MAC addressing. |
| Leaky Pipe (icon) | An icon representing an insecure hostname request. |
| License Key | A code that grants permission to use Ridgeback in compliance with the terms of a license agreement. |
| License Name | The official name of the license under which Ridgeback is authorized for use. |
| Link | A connection between two endpoints. |
| Link Load | The average number of links per endpoint. |
| MAC Address | A unique identifier assigned to network interfaces for communications at the data link layer (i.e., layer 2). |
| mDNS | Multicast DNS, an insecure protocol allowing devices on the same local network to resolve hostnames to IP addresses. |
| Microsegmentation | Dividing a network into smaller, isolated segments to limit the spread of threats and increase control. |
| Multi-Factor Authentication (MFA) | An authentication method requiring multiple forms of verification to access a system or service. |
| Multicast | A method of data transmission where packets are sent to multiple recipients on a network simultaneously. |
| Nameserver | A server that translates domain names into IP addresses for network routing. |
| Network Access Control (NAC) | Policies and technologies used to regulate access to network resources based on device identity and security. |
| Network Address Translation (NAT) | A method of mapping private IP addresses to a public IP address for devices to communicate outside a local network. |
| Network Graph | A visual diagram showing the relationships and connections between endpoints and devices within a network. |
| Network Hygiene | Regularly maintaining and securing a network to prevent vulnerabilities, ensure compliance, and sustain optimal performance. |
| Network Segment | A defined portion of a network, often isolated to improve security and traffic management. |
| Packet | A small unit of data transmitted over a network, containing both header information and payload data. |
| Phantom | Ridgeback's response to attempts to contact unused addresses. |
| Port | A virtual point for network communication, allowing services and applications to receive specific traffic. |
| PowerShell | A command-line shell and scripting language often used for task automation on Windows systems. |
| Protocol | A set of rules governing data exchange between devices on a network, ensuring compatible communication. |
| ProxMox | An open-source platform for virtualization, supporting virtual machines, containers, and clusters. |
| Rcore | Ridgeback's component used to read and inject network traffic. |
| Recon Threat | An endpoint that has contacted an unused address and has not tried to exchange data. |
| Reconnaissance | The act of scanning or exploring a network or system to identify vulnerabilities and gather intelligence. |
| SQL | Structured Query Language, a standard language for managing and querying relational databases. |
| Script | A sequence of instructions or commands executed to automate tasks on a computer or network. |
| Segmentation | Dividing a network into smaller parts to improve security, performance, and control over traffic. |
| Service | A network or system function that provides specific capabilities, such as file sharing, web hosting, or databases. |
| Service Load | The average number of services per endpoint. |
| Shield (icon) | The shield icon represents where and endpoint has tried to contact a phantom. |
| Superadmin (account) | A Ridgeback account with administrative privileges for an entire Ridgeback installation. |
| System Security Plan (SSP) | A documented framework outlining security requirements, controls, and practices for a system or network. |
| TCP | Transmission Control Protocol, a reliable communication protocol ensuring ordered and error-checked data delivery. |
| Threat | Within the context of Ridgeback, a threat represents any potential risk, vulnerability, or adversarial path that could compromise the integrity, confidentiality, or availability of network assets. |
| User | An account or individual with access to a network or system, typically with restricted privileges. |
| VLAN | Virtual Local Area Network, a logical subdivision of a network that isolates devices as if on separate networks. |
Contact and Support Information
For any assistance, send an email to:
support@ridgebacknet.com